
This easy-to-use media server keeps your movies, TV, and music at your fingertips.
Think of Plex as "iTunes, but for everything you didn’t buy from Apple." With a Plex media server and apps on your computers, iOS devices, and Apple TV, you can store and stream your collection of non-DRM movies, TV, music, and more to any device, anywhere. Better yet, you can share all that media with your Plex-using friends, and enjoy streaming theirs in return. And that’s just the stuff you can do for free.
What Plex can (and can’t) do
Plex can catalog and play your personal, non-iTunes digital library of:
- Movies
- TV shows
- Music
- Photos
You can play these files over your local network or anywhere you’re connected to the Internet — at the gym, at a friend’s house, while traveling, etc. With the right tuner and a Plex Pass subscription, Plex can also play live TV — even remotely over the Internet – and work like a DVR.
Plex has also branched out into more Internet-based services:
- Podcasts
- Web shows
- An optional add-on subscription to the TIDAL streaming music service
But it’s gotten rid of a few features it previously offered:
- Cloud-based storage for your media library
- Plugins that streamed web video from major networks’ sites, among other add-ons
Plex is one of many Mac media server and/or DVR solutions. Rivals include:
- The Kodi media server (which can work with Plex, too)
- Geniatech’s EyeTV 3 DVR
- SiliconDust’s HDHomeRun DVR
- Channels, which streams and records live TV
- Emby, a media server with live TV and DVR support
How does Plex work?
Plex has two main components. Plex Media Server handles the back end, working behind the scenes on your server of choice to keep track of your media, convert it on the fly to streaming-friendly formats, and pipe it to you over your home network or the Internet.
Plex’s Media Player apps provide the front end, playing all that media for your enjoyment. You can play Plex media through your web browser or native apps for Mac OS, AppleTV, and iOS, among many many other devices. Most apps are free; iOS apps cost $5 unless you’re a Plex Pass subscriber.
You only need one computer running Plex Media Server. That same computer can also run Plex Media Player, as can any other devices you connect to your server. If for whatever reason you want multiple Plex servers on a single network, Plex is cool with that, too.
You can invite Plex-using friends to share and stream your media, and vice versa; you only need to know their email address or Plex username. For obvious anti-piracy reasons, you can view or listen to, but not download, another user’s media files.
Plex Media Server can run on Macs, Windows, or Linux computers, a sufficiently powerful NAS drive, even one model of Netgear router. But for this guide, we’ll focus on getting it running on a Mac.
How to install Plex on a Mac
To set Plex up as a basic media server, you’ll need:
- An always-on, Internet-connected Mac running Mac OS 10.9 Mavericks or later, with an Intel Core i3 processor or faster, and 2GB of RAM or more. Most Macs will clear these hurdles easily; my 2012 Mac mini runs Plex like a champ.
- One or more large hard drives, internal, external, or network-connected, to store your media.
- A free Plex account.
- Plex Media Server for Mac.
- Plex Media Player apps for any devices you wish to use.
1. Prepare your video and audio.
Plex does a good job of identifying and cataloging your media all on its own, but it still needs a little help from you. We’ll give you a quick guide here, but for more information, consult Plex’s help files.
Before you begin, remember that any DRM-locked content you’ve purchased from iTunes won’t work with Plex. The files might show up if you point Plex toward the folder where they live, but Plex won’t be able to play them.
For music, Plex supports:
- AAC
- ALAC
- E-AC3
- FLAC
- MP3
- M4A
- WAV
For video, it’ll play:
- ASF
- AVI
- MOV
- MPEG Transport Stream or TS
- WMV
- MP4 (H.264 and HEVC/H.265)
- MKV (H.264 and HEVC/H.265)
Make sure that each type of media you want to add to Plex has its own folder — for example, put all your movies in a Movies folder, and TV shows in a different TV Shows folder. These folders don’t have to live on the same hard drive, and if you happen to have one set of movies on one drive, and another elsewhere, you can add both to Plex as separate libraries, and they’ll all show up under Plex’s Movies category.
Movies are pretty simple to prepare and add. You can just drop the files in your Movies folder, and Plex will generally recognize them by name. If you want to make sure Plex doesn’t confuse your film for a movie of the same title, make sure to include the year it was made in (parentheses) after the title:
Movies > It's A Wonderful Life (1946).mkv
TV shows take a little more effort. Here’s the basic file structure:
TV Shows > Name of Show (Year It Premiered) > Season 01 > Name of Show - s01eXX - Episode Title.mkv

You don’t need that episode title, nor the year in parentheses, for Plex to recognize the file, but they certainly don’t hurt. You definitely need the show’s name and the season and episode numbers in every file name. Here are a few examples that would all work:
TV Shows > Brooklyn Nine-Nine (2013) > Season 05 > Brooklyn Nine-Nine (2013) - s05e14 - The Box.ts
TV Shows > Farscape > Season 03 > Farscape - s03e01 - Season of Death.mkv
TV Shows > Agent Carter > Season 01 > Agent Carter - s01e07.mp4
2. Sign up for a Plex account
Visit Plex’s site to create an account. It’s free, and the account will help you sign in to both your server and any player apps.
3. Install Plex Media Server
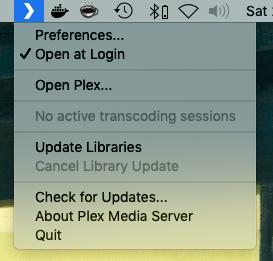
Download Plex Media Server for Mac on the computer you want to be your server. (Make sure you verify the checksum before you open the downloaded file!) Move the resulting Plex Media Server app into your Applications folder. When you open it, the only indication you’ll see that it’s running is a tiny Plex chevron icon on the right side of your menubar at the top of your screen.
When the grayed out "Server is starting…" message disappears from that menu, the server’s up and running. Plex will open your browser of choice and prompt you to log in with your account. (If it doesn’t, select Open Plex from the server menu.)
4. Set up your server
Plex’s Setup Wizard will find your server on your network and ask you to give it a "friendly name" — a moniker that will help you identify your server and tell it apart from any others you might connect to.
It’ll also ask whether you want to access your server outside your home. If you say yes, it’ll do its best to automatically adjust your network settings so that you can see the media on your server from anywhere with an Internet connection.
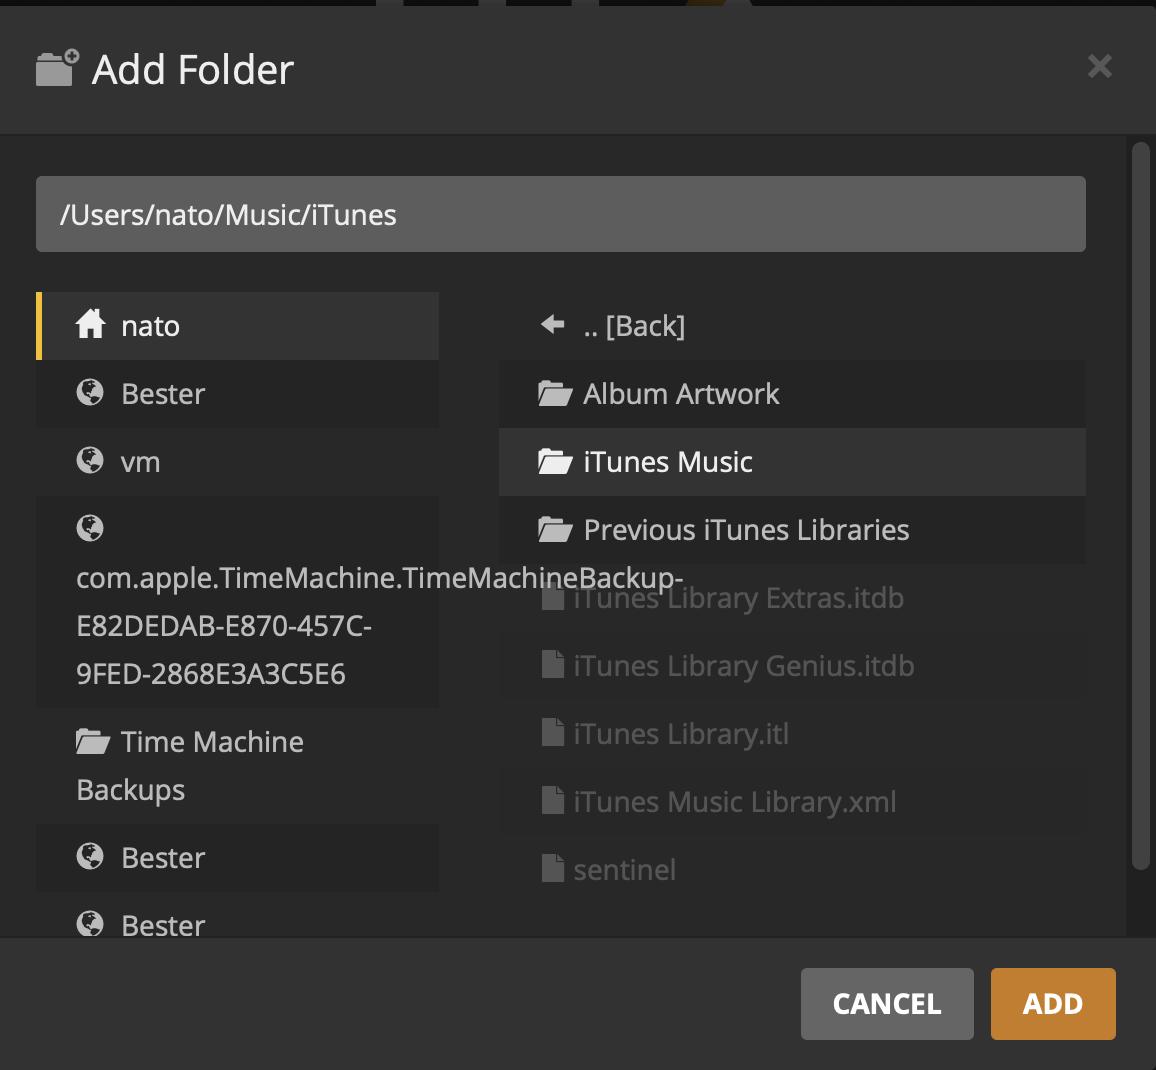
Next, it’ll ask you to point Plex toward the folders where you keep your movies, TV shows, music, and/or photos. You don’t have to add all of these at setup – my server only has movies and TV shows – and you can always add libraries later if you wish.
When you’re done, Plex will finish setup, start scanning the folders you specified to catalog your media, and then use the Internet to pull in artwork, descriptions, and other metadata for everything in your library. This might take a minute or two.
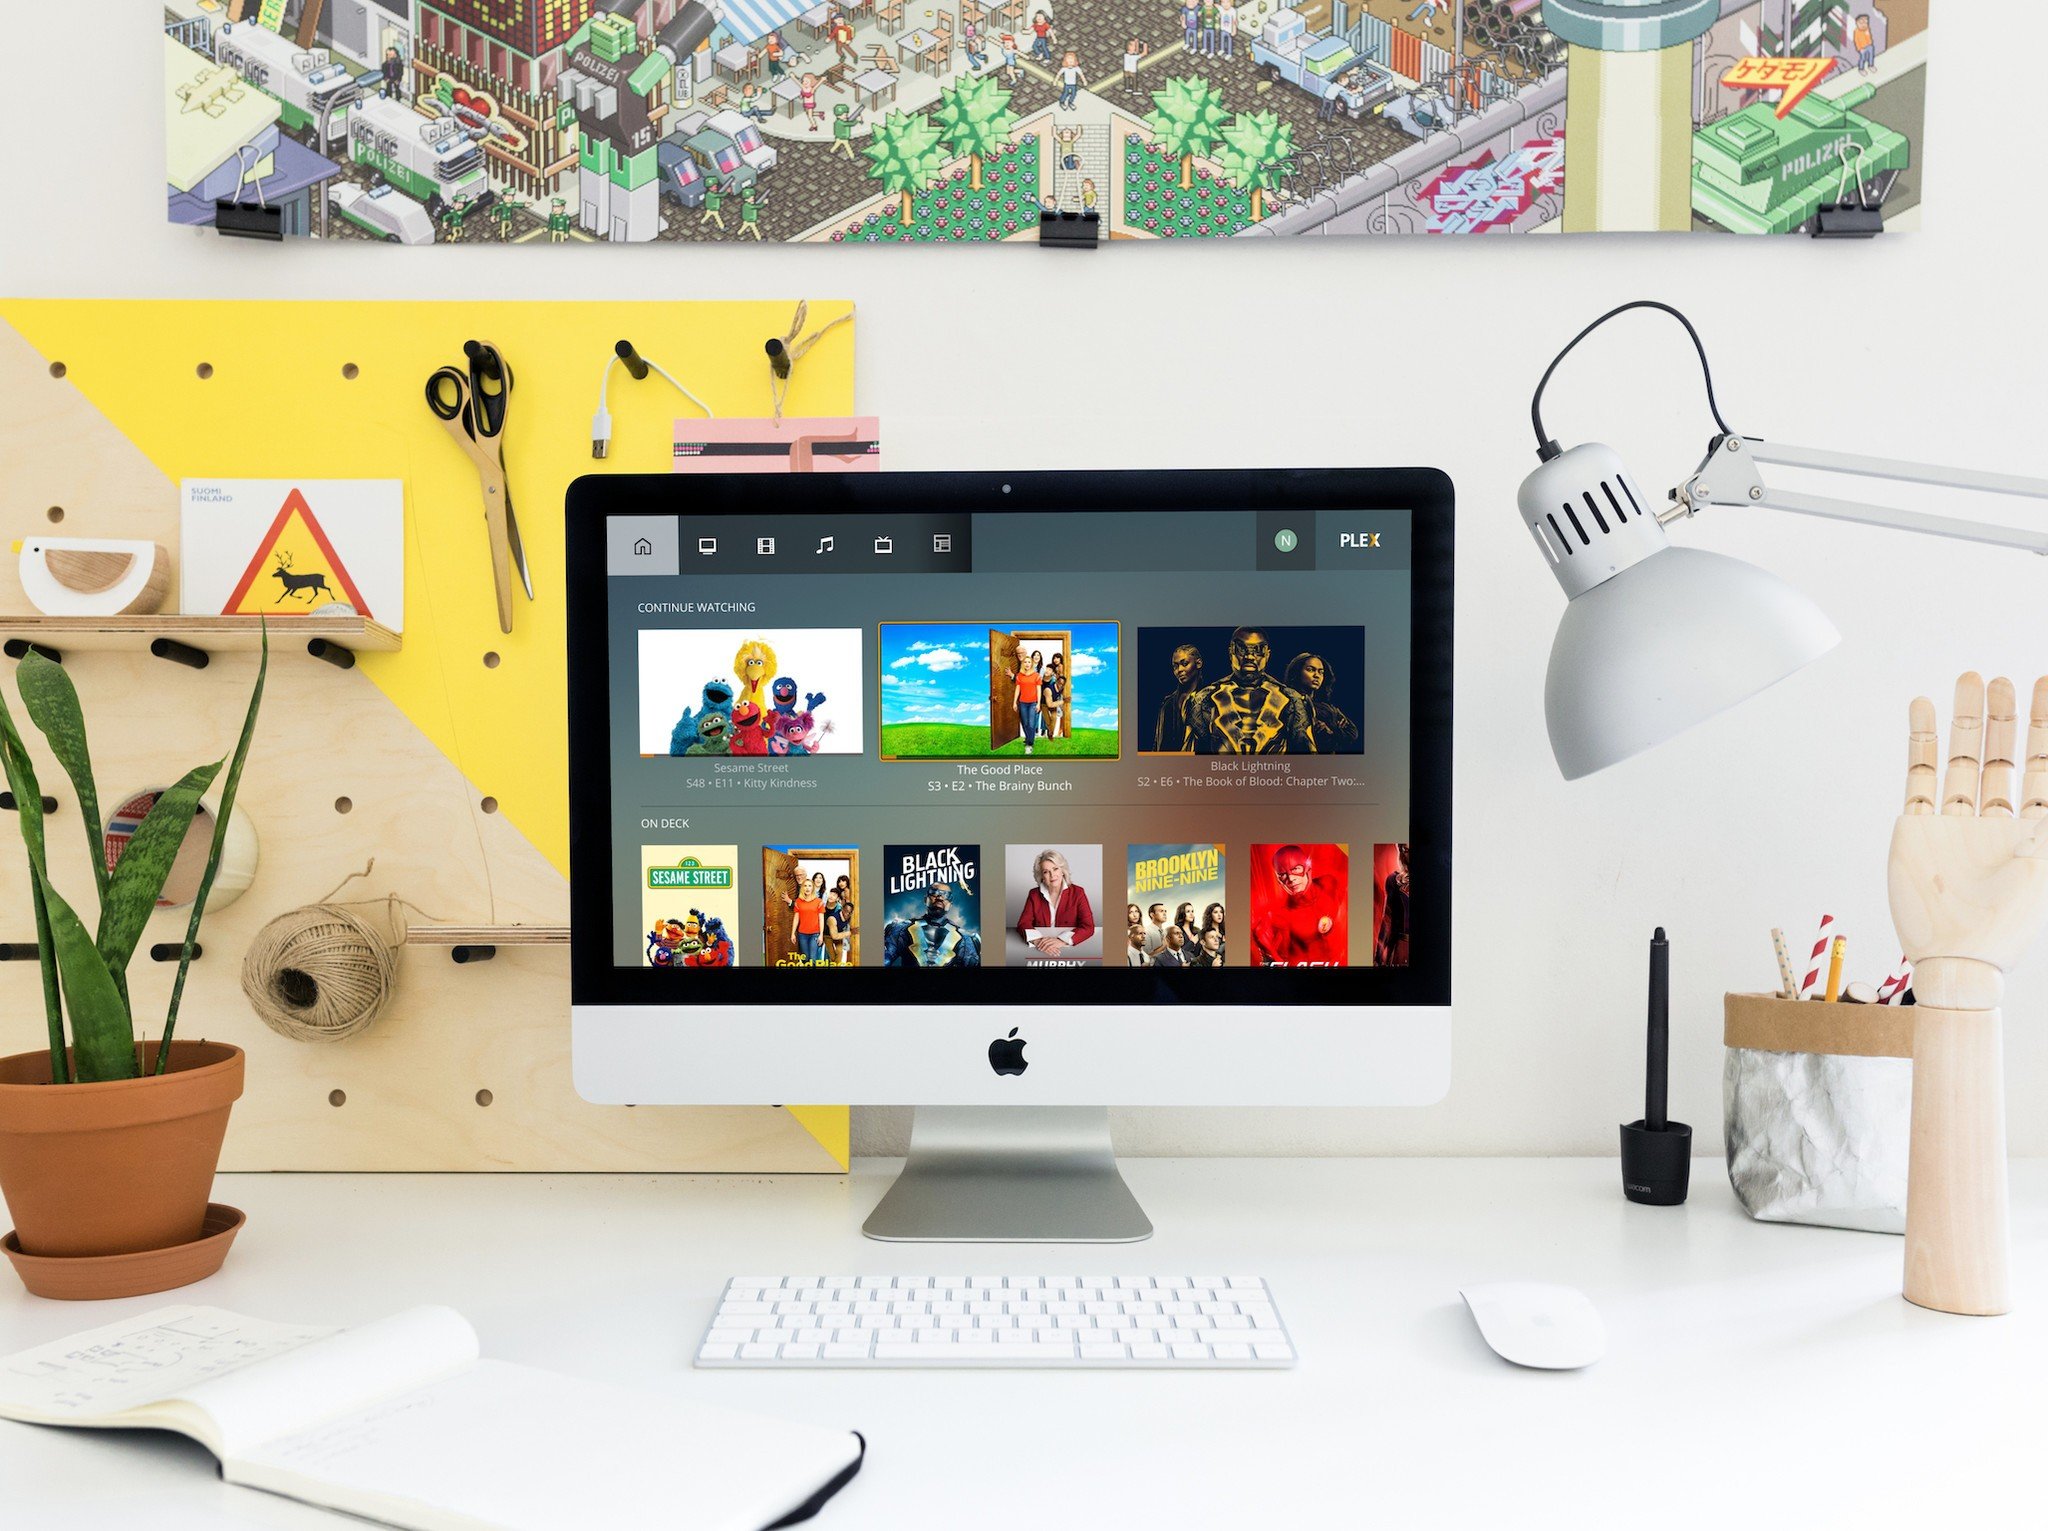
5. Explore the Web app
Plex’s Web app runs in your browser. Like Plex’s other Player apps, it’ll play all your music and video, but it has lots of powers the other apps don’t.
To open the Web app on the computer running Plex Server, choose Open Plex… from the Plex menu on the right side of the menubar. If you’re on a different computer connected to your network, you can browse to http://[Your Server's IP Address Here]:32400. But for the easiest way to open the web app, just go to http://app.plex.tv. That’ll work anywhere, as long as you have an Internet connection.
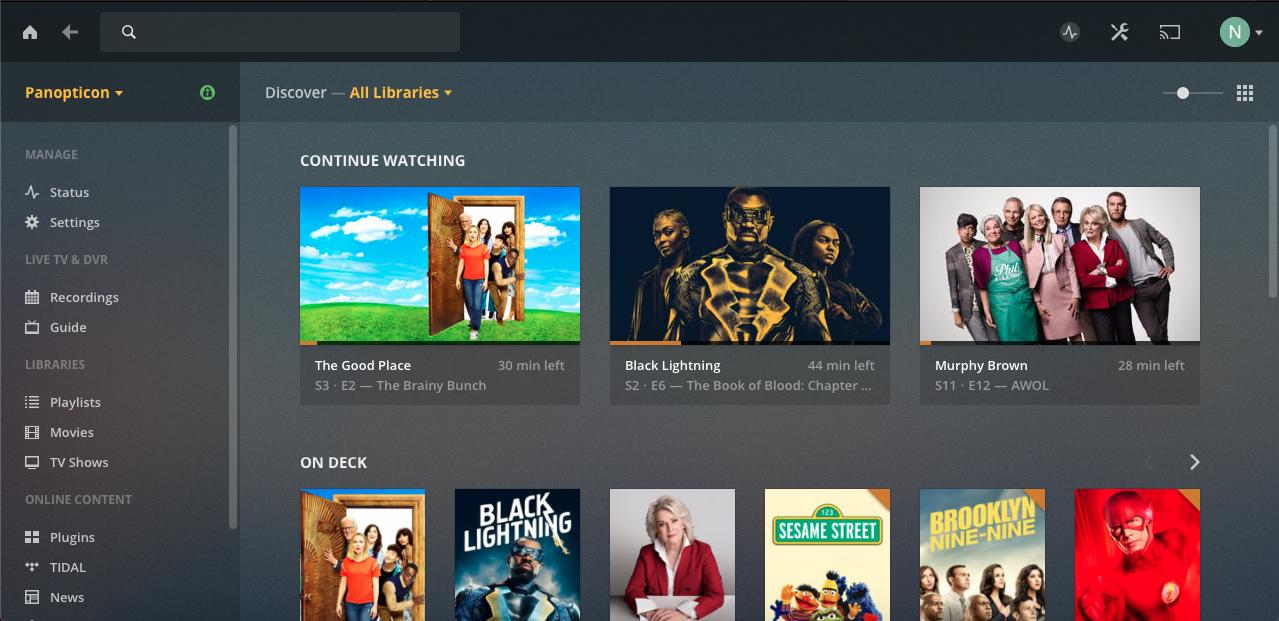
From left to right at the top of the screen, you’ll see:
- The home button – which will return you to the Web app’s main screen from anywhere you browse.
- The back button – to return you to previous page you visited.
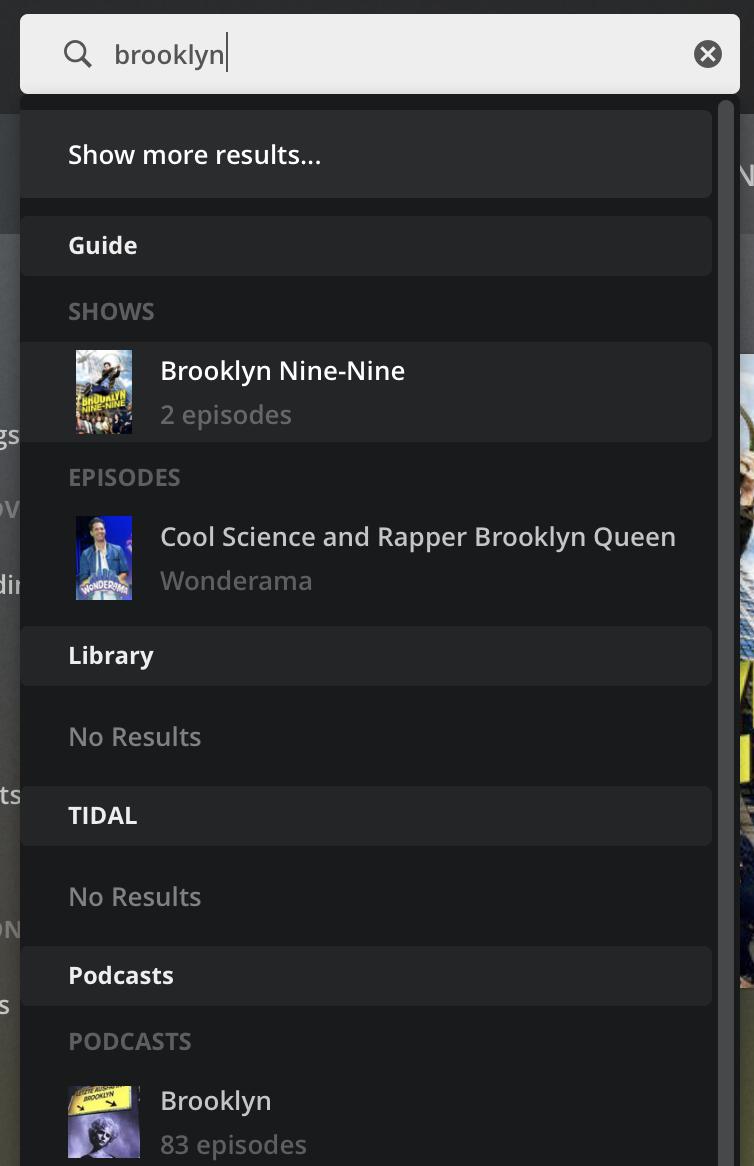
- The search bar – where Plex will look through your libraries, its podcast listings, and (if you’ve signed up for Live TV) its program guide for items matching your search.
- The Activity button will show you a quick list of what’s being played on your server, by which user(s).
- The Settings button opens Settings, which we’ll talk about in a second.
- The Select Player button, which works like AirPlay on Macs. You can choose another open Plex player on your network, and send video or audio to play there.
- The Accounts menu, where you can edit your own account settings or create new users.
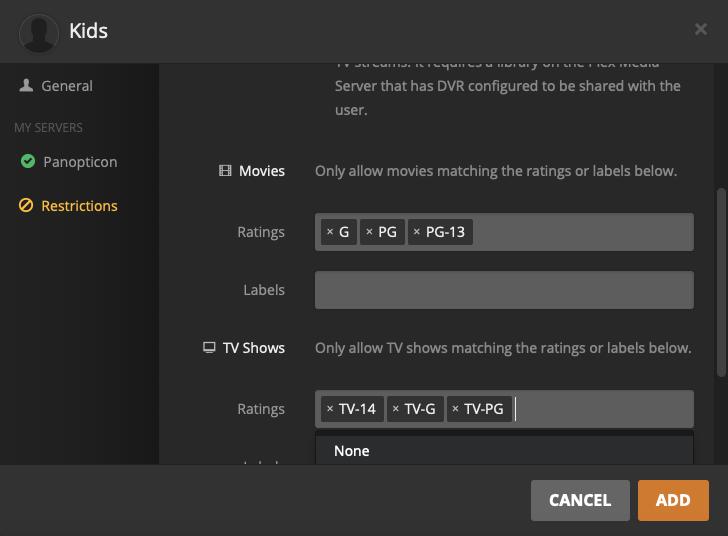
Open the Accounts menu and select Users. You’ll be the only user listed, but you can add new ones or enable guest access. You can add existing Plex users to your server by entering their e-mail address or Plex account username, or create managed users under your own account – say, separate logins for your spouse and kids. For each managed user, you can choose which libraries they have access to, and limit content by movie or TV ratings or particular labels you’ve given your media.
In the list of accounts, click the lock icon next to an account’s name to specify a four-digit pin that user will need to access their account. (That’s a good way to keep smaller people away from inappropriate audiovisual experiences.)
Next, open Settings. Plex generally does a good job of making the different categories here self-explanatory, and of setting up your server so that you don’t need to go tinkering with settings any more than you want to. But let’s review a few quick essentials.
Settings > General will tell you whether a new version of Plex Server is available, though Plex will usually also let you know this from the home screen or any of its apps. You can download or learn more about each update here. New versions tend to roll out about once a month, if not more frequently.
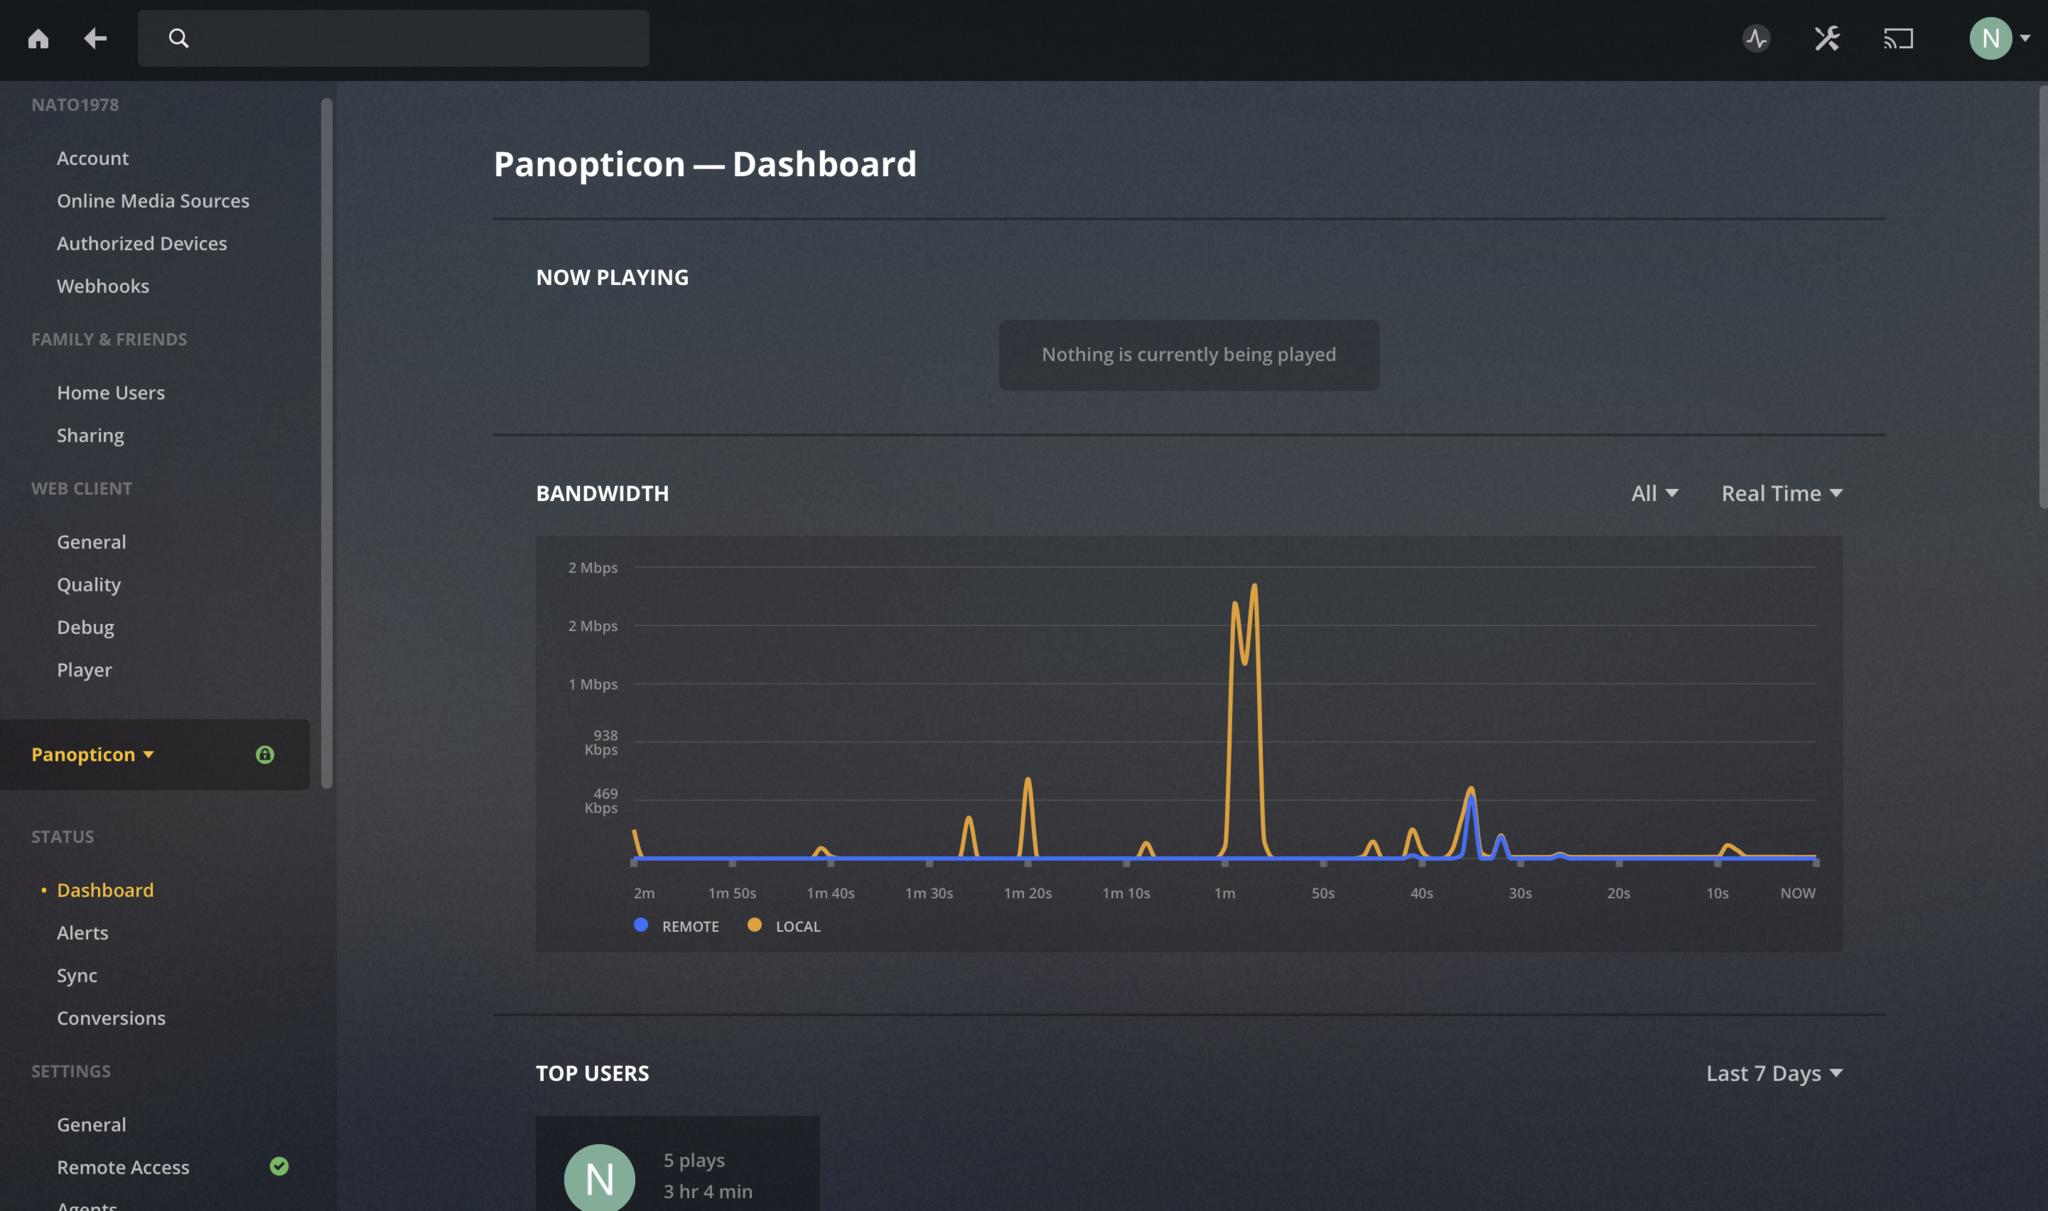
Settings > Remote Access lets you control whether your Plex media’s available over the Internet. Remember to set your maximum upload speed here, so that you don’t choke Plex or your own bandwidth when you’re serving yourself media away from home. Check your internet connection’s speed to figure out what number to set.
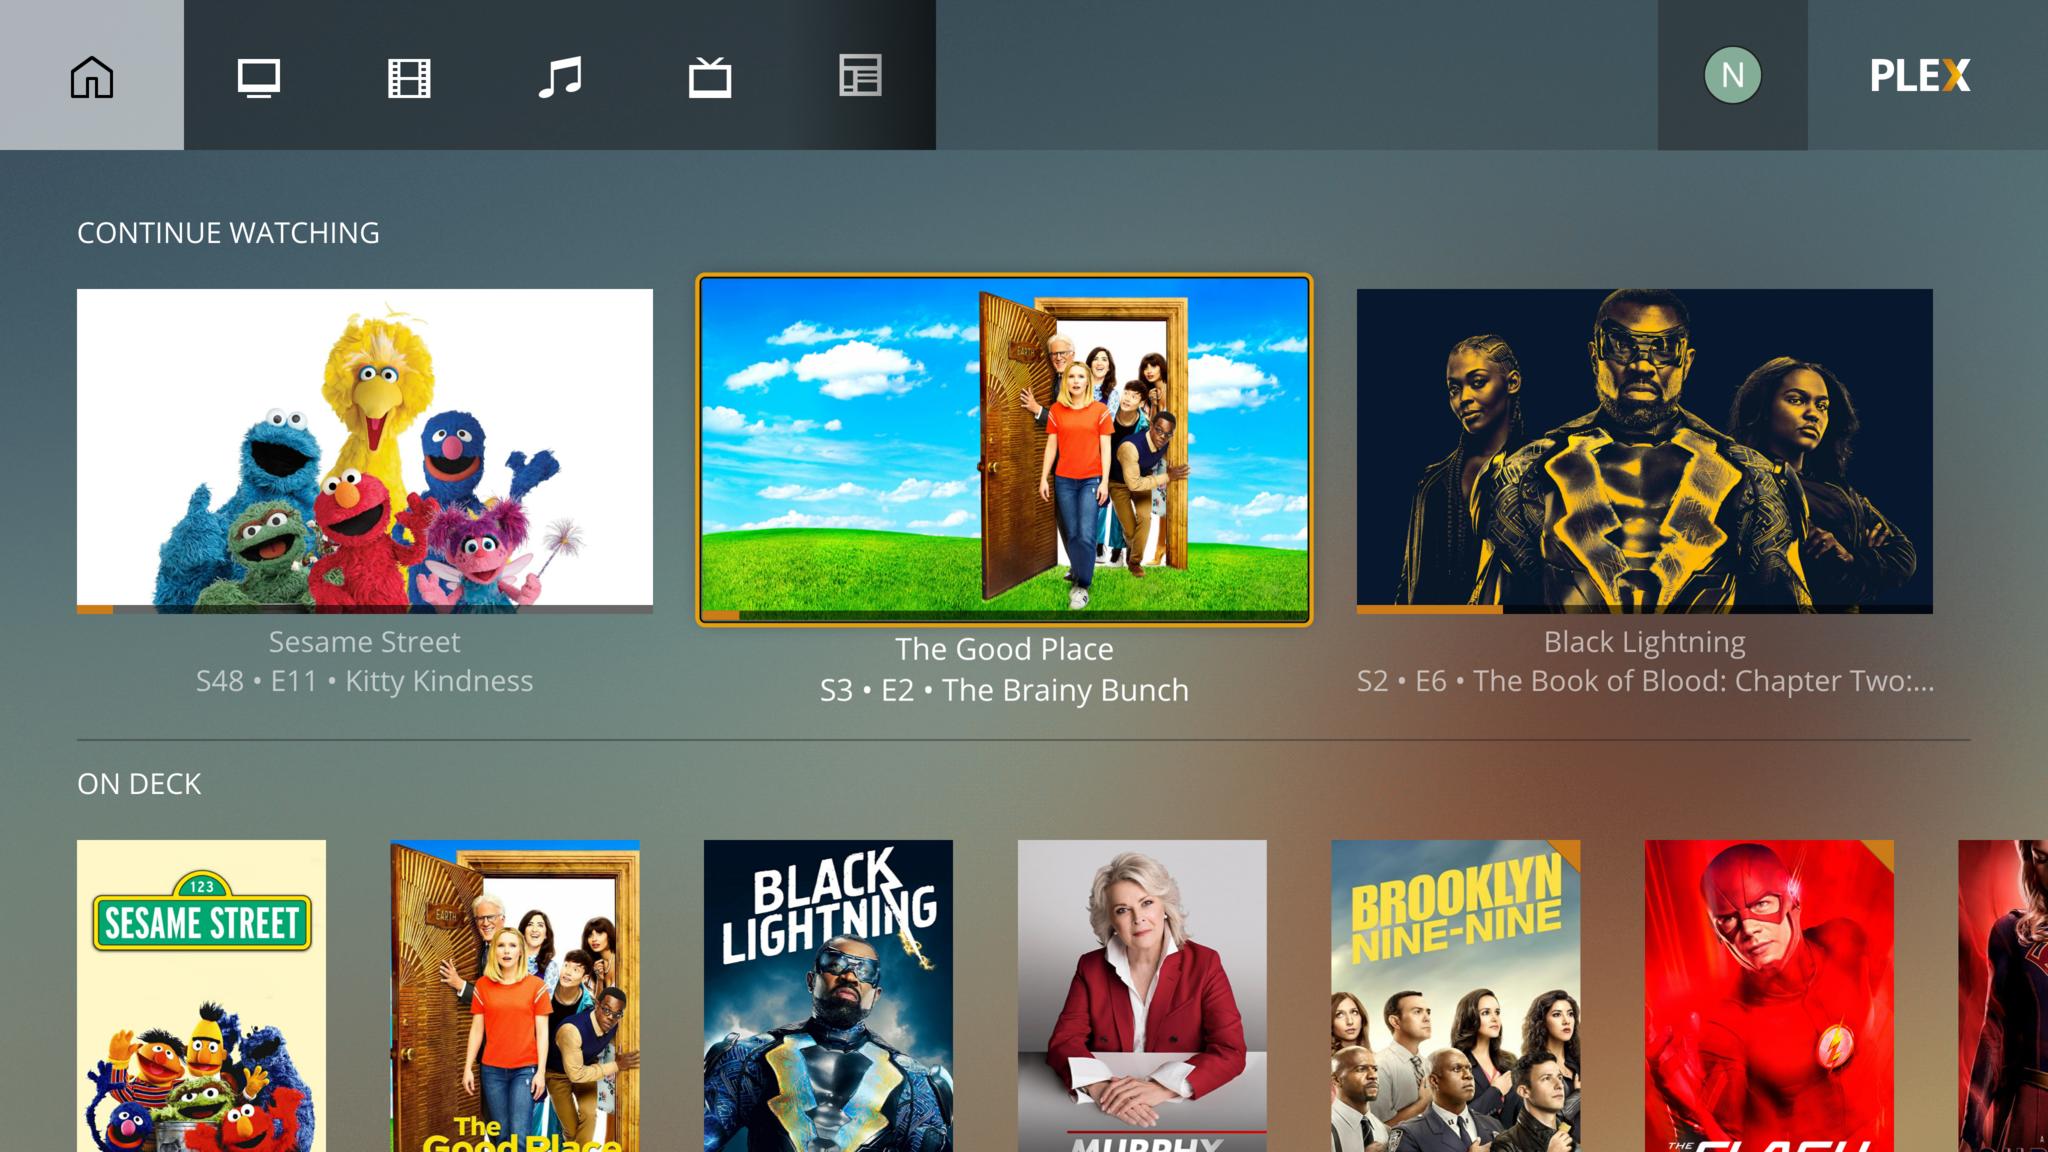
Finally, you’re probably wondering, you know, how to play your media. The home screen will show the last three movies or TV shows you’ve been watching recently. If you have TV shows, it’ll list what’s "on deck" — the latest or next episode in each series you’ve been watching. It also provides recently added TV episodes or series and movies. You can jump directly to any of your libraries under Libraries on the left sidebar. (If you want to add more libraries, look for the plus sign that appears when you hover over that header.)

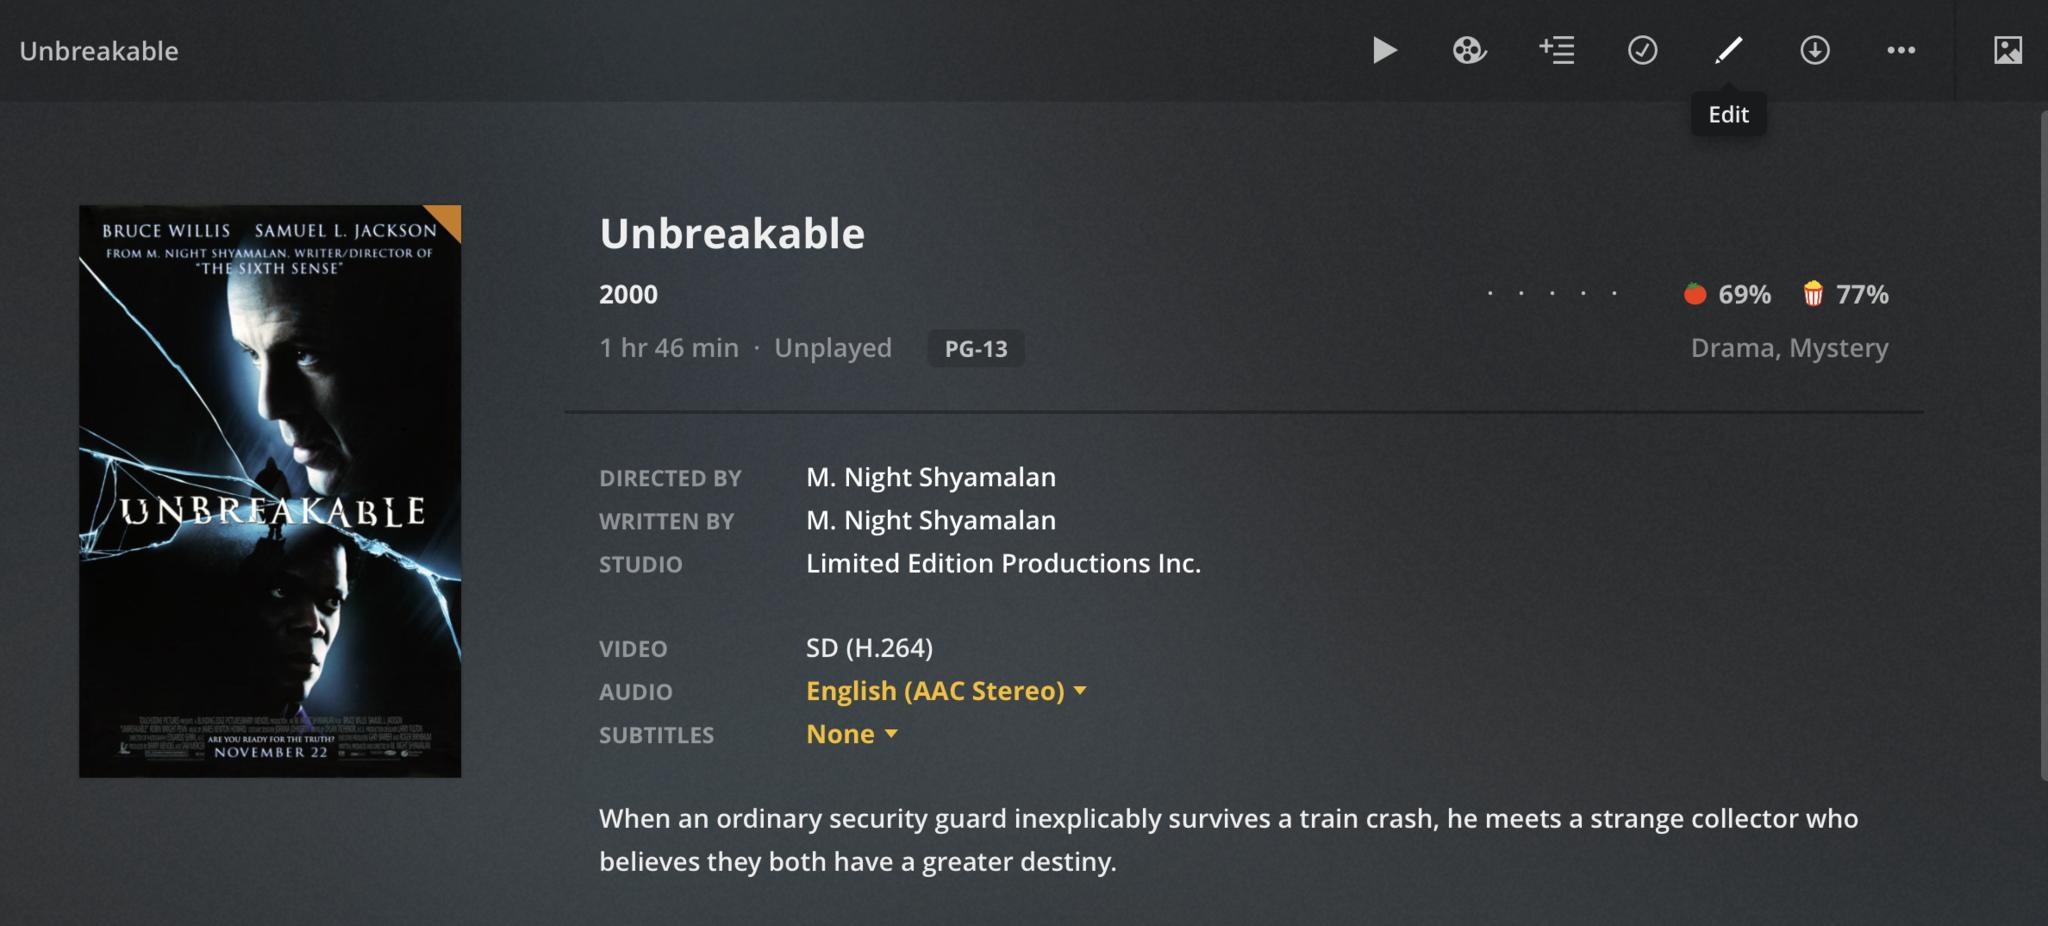
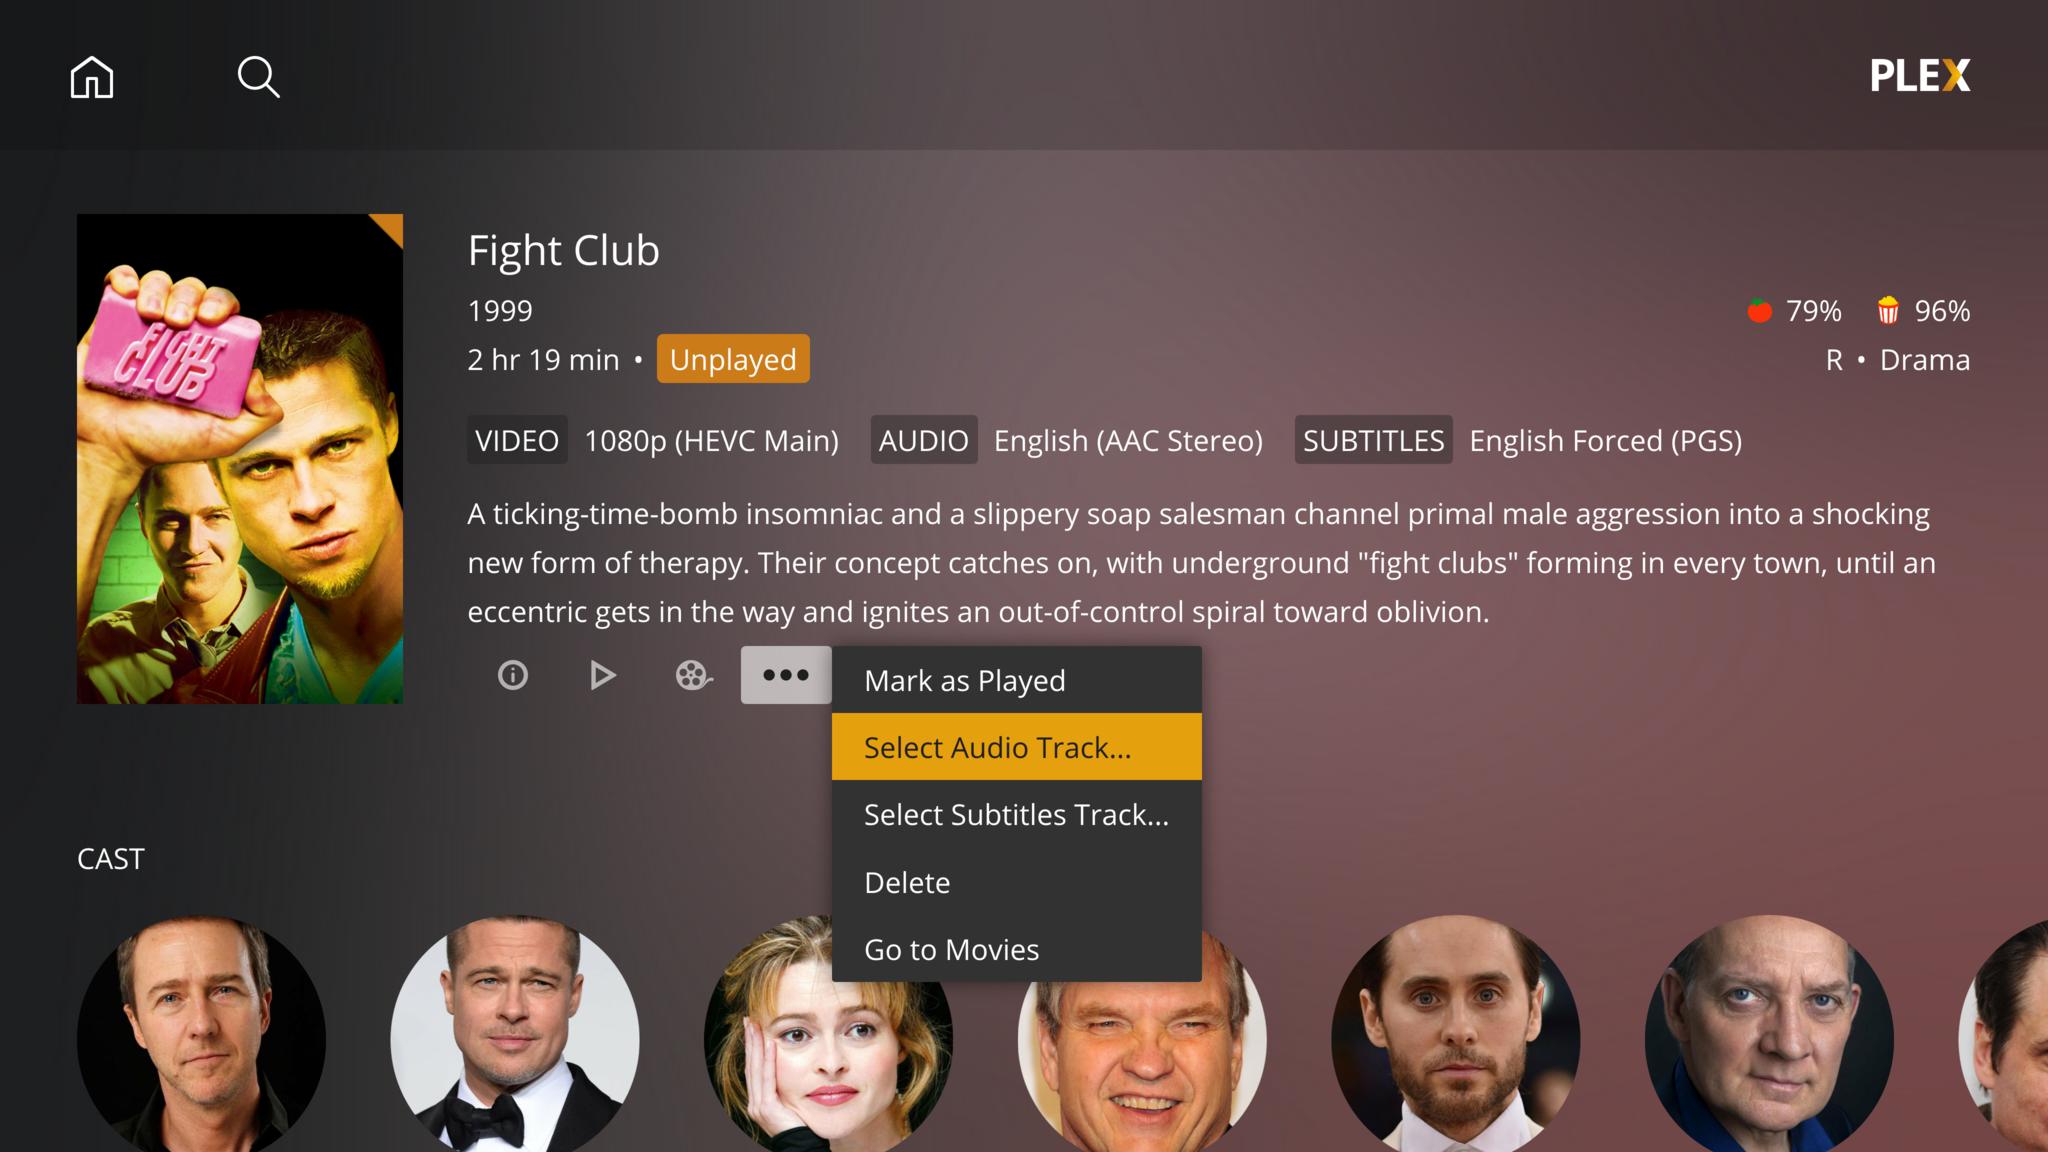
Roll over any of the items on the main screen, and you’ll see a play icon in the middle, to jump right into watching or listening. The pencil icon in the lower left lets you edit that file’s metadata, in case Plex got its name or any other info wrong.
The … in the lower right provides general options like Optimize, to create a smaller compressed version of the video for easier storage and streaming, Download to move a copy of any media you own to your local device for offline viewing, or the self-explanatory Delete.
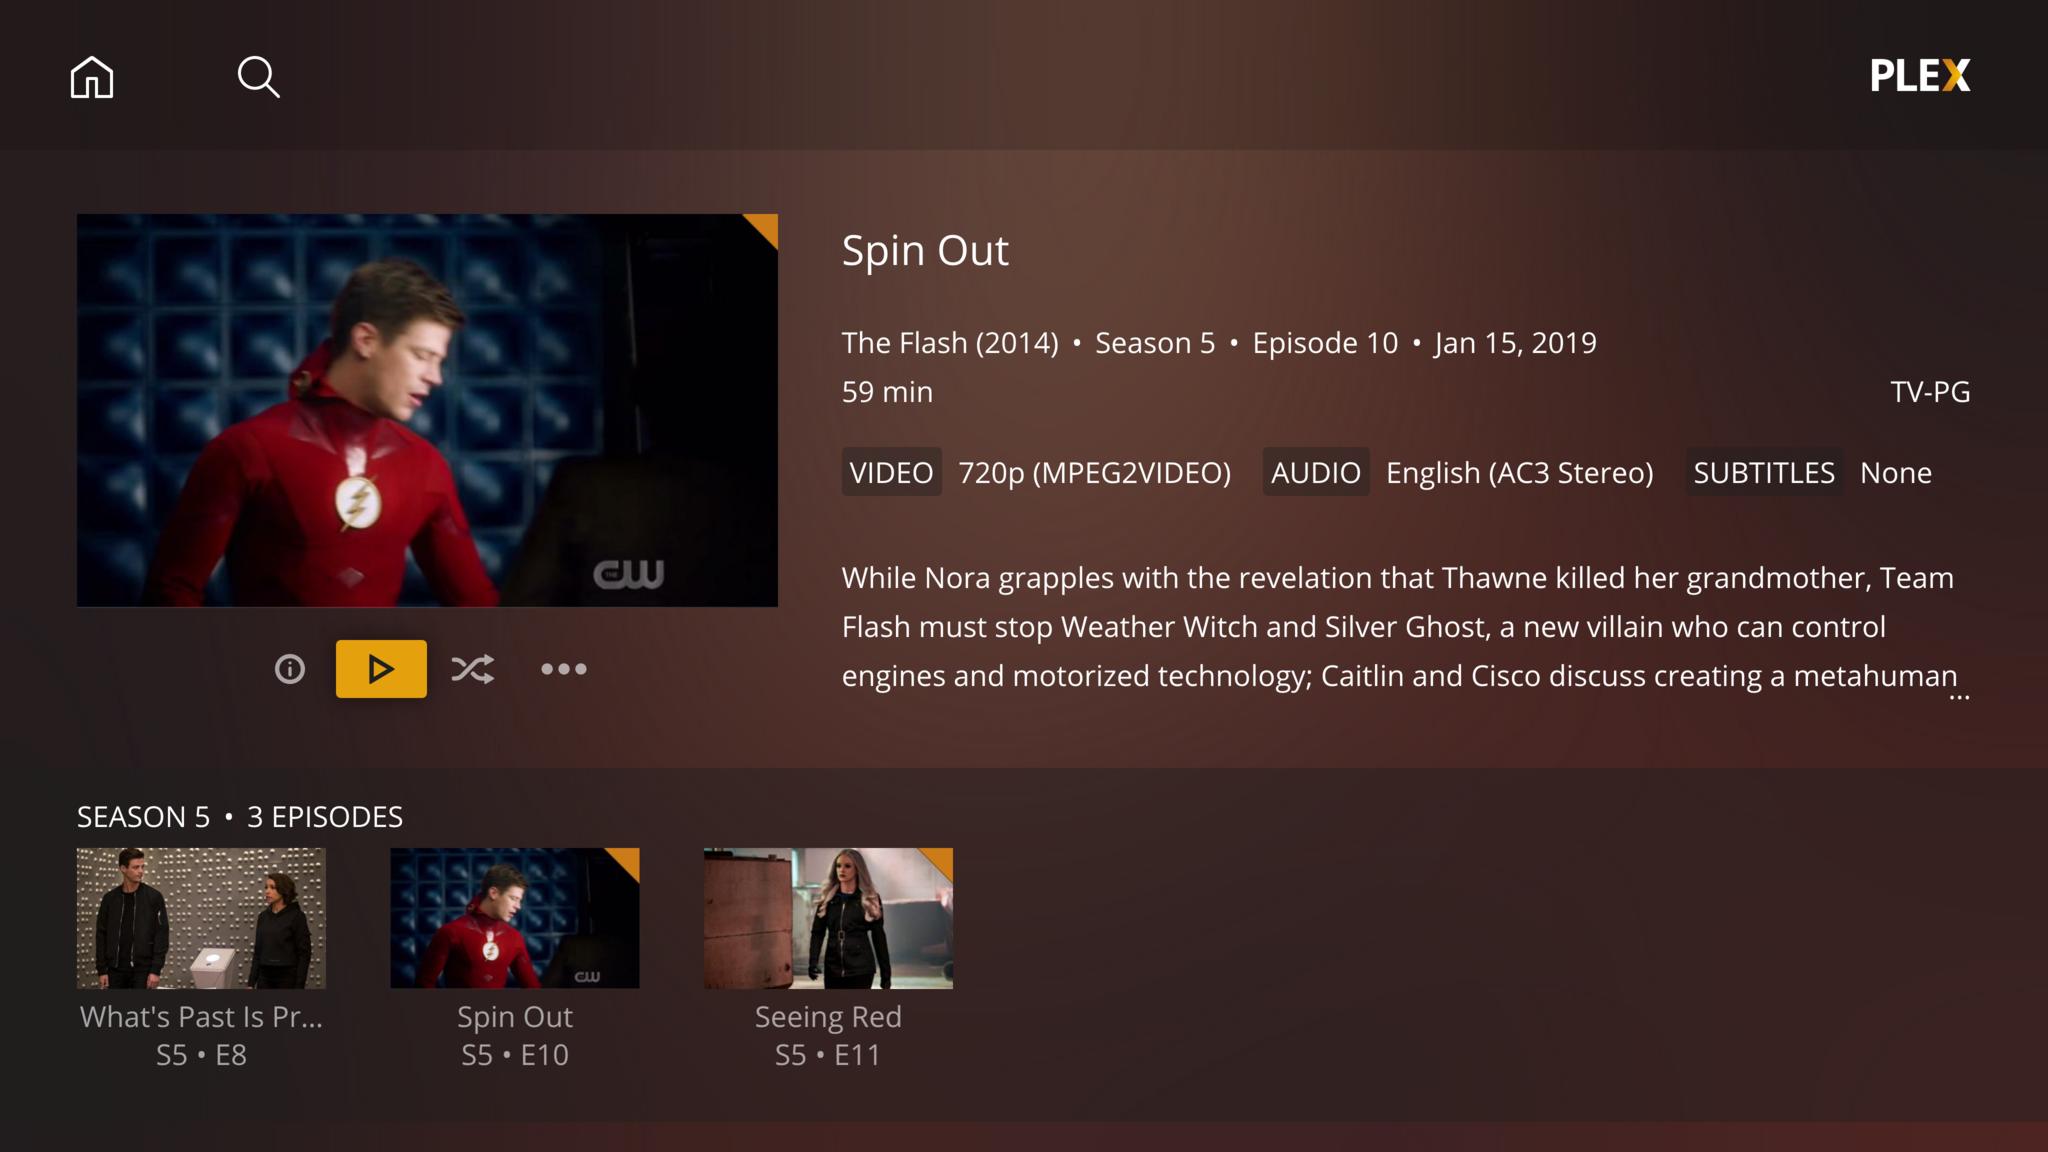
Clicking anywhere else gets you to the show or movie’s page, with a plot synopsis, cast or episode lists, and other data.
6. Download a player app
The web app works great and doesn’t look too shabby, but if you’d like an interface that’ll look even better on a big screen, get the Plex Media Player for Mac. It starts out looking identical to the Web app, but you can click the fullscreen button in the upper right corner of its main page to activate a slick TV-oriented interface that plays well with remote controls.
You can score Plex’s iOS and AppleTV apps from the App Store. As mentioned earlier, iOS apps will cost you a one-time $5 fee if you want to stream media from outside your local network, unless you have a Plex Pass.
How to set up live TV and DVR features on Plex
Once you’ve got the basics up and running, here’s what you’ll need to turn Plex into a substitute for your set-top box:
- A Plex Pass subscription. Plex Pass costs $5 a month, $40 a year, or $120 — which occasionally drops to $90 or less during sales – for a lifetime pass. The monthly rate’s great for trying out the full service. If you like Plex enough to keep it, the lifetime pass is your best value. In addition to live TV and DVR service, Plex Pass offers further premium features for music, photos, and movies, plus a rotating roster of discount coupons on hard drives, VPN service, network tuners, and other Plex-compatible goods.
- One or more SiliconDust HDHomeRun tuners, each with either an antenna or a CableCARD, depending on your chosen model. The HDHomeRun tuners pipe broadcast or unencrypted cable TV signals into your network, where you can watch them with apps or compatible devices, or use them with apps like Plex. On other platforms, Plex works with additional tuner hardware, but its Mac versions only support HDHomeRuns. Plex can support multiple tuners hooked up to the same server.
1. Begin setup
Go to Settings > Mangage > Live TV & DVR to get the ball rolling.
2. Find your tuner
After you start setup, Plex will look for tuners connected to your network. Make sure your HDHomeRun tuner is hooked up and running before you start this step.
3. Find a guide and choose channels
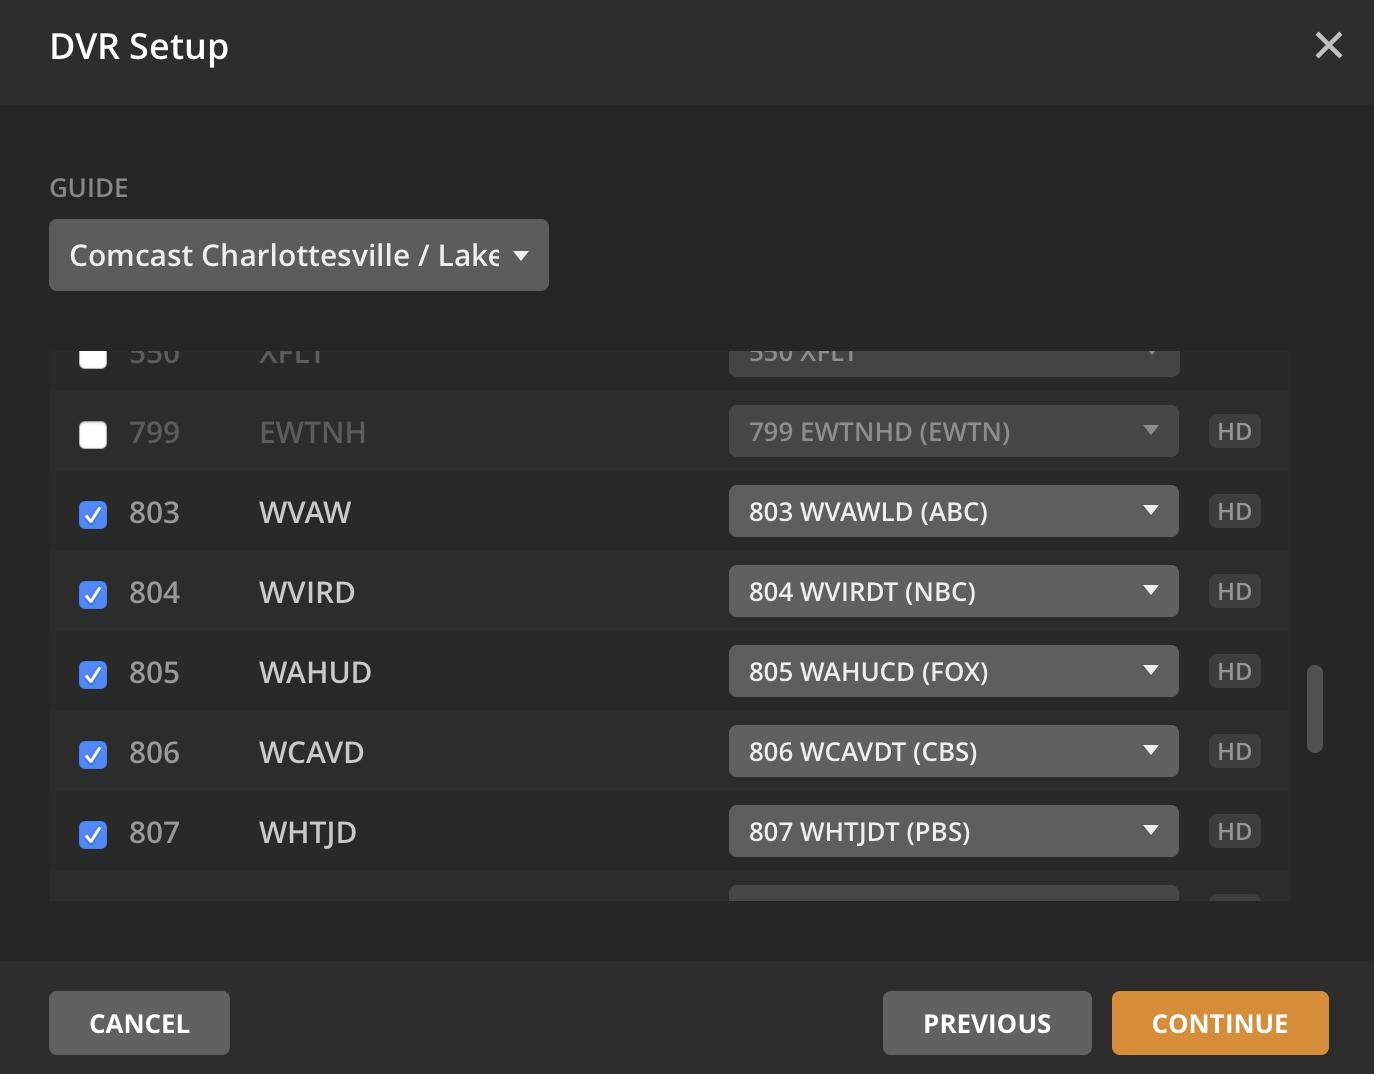
Plex will pull in all the channels it finds on your tuner, then ask whether you want broadcast or cable listings, and request your ZIP code. With that information, it can match local channel names to the channel numbers on your tuner.
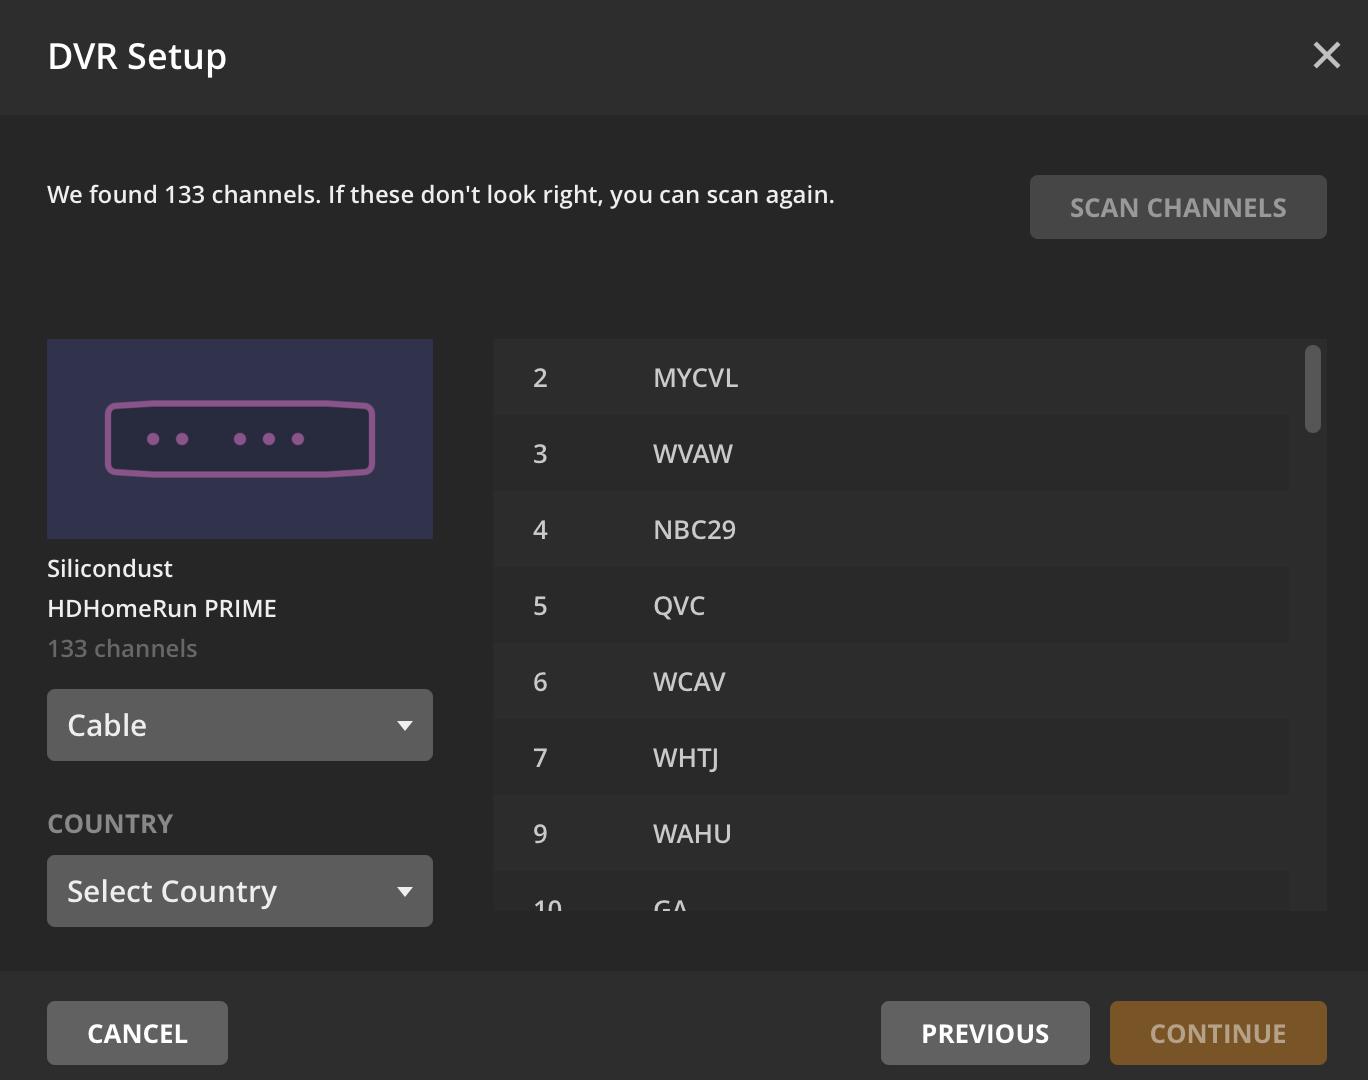
In the list that appears, select the channels you want Plex to include, and make sure they’re correctly matched with the channel names next to them. If not, you can use the pulldown menus next to each channel number to assign it the correct name and information.
4. Download listings and start watching
Plex pulls in this information a lot faster than some other DVR software I’ve tested, but it’ll still take a few minutes to download two weeks’ worth of listings and program info for the channels you’ve selected. Plex lets you start browsing and watching while it pulls in that data.
From here on out, you can always return to Settings > Manage > Live TV & DVR to view and edit your connected tuners, turn on or off commercial skipping for all programs (more on that in a second), and adjust your channel preferences.
5. Check the Program Guide
On Plex’s Web and iOS apps, you’ll see a swanky grid view with all currently airing shows on your channels. (The Mac app’s not there yet as of this writing, but give it time. It uses the older Discover view, which you can still get through the Web app, showing currently airing shows, shows due to air next, and forthcoming new episodes, movies, sports, and news broadcasts.)
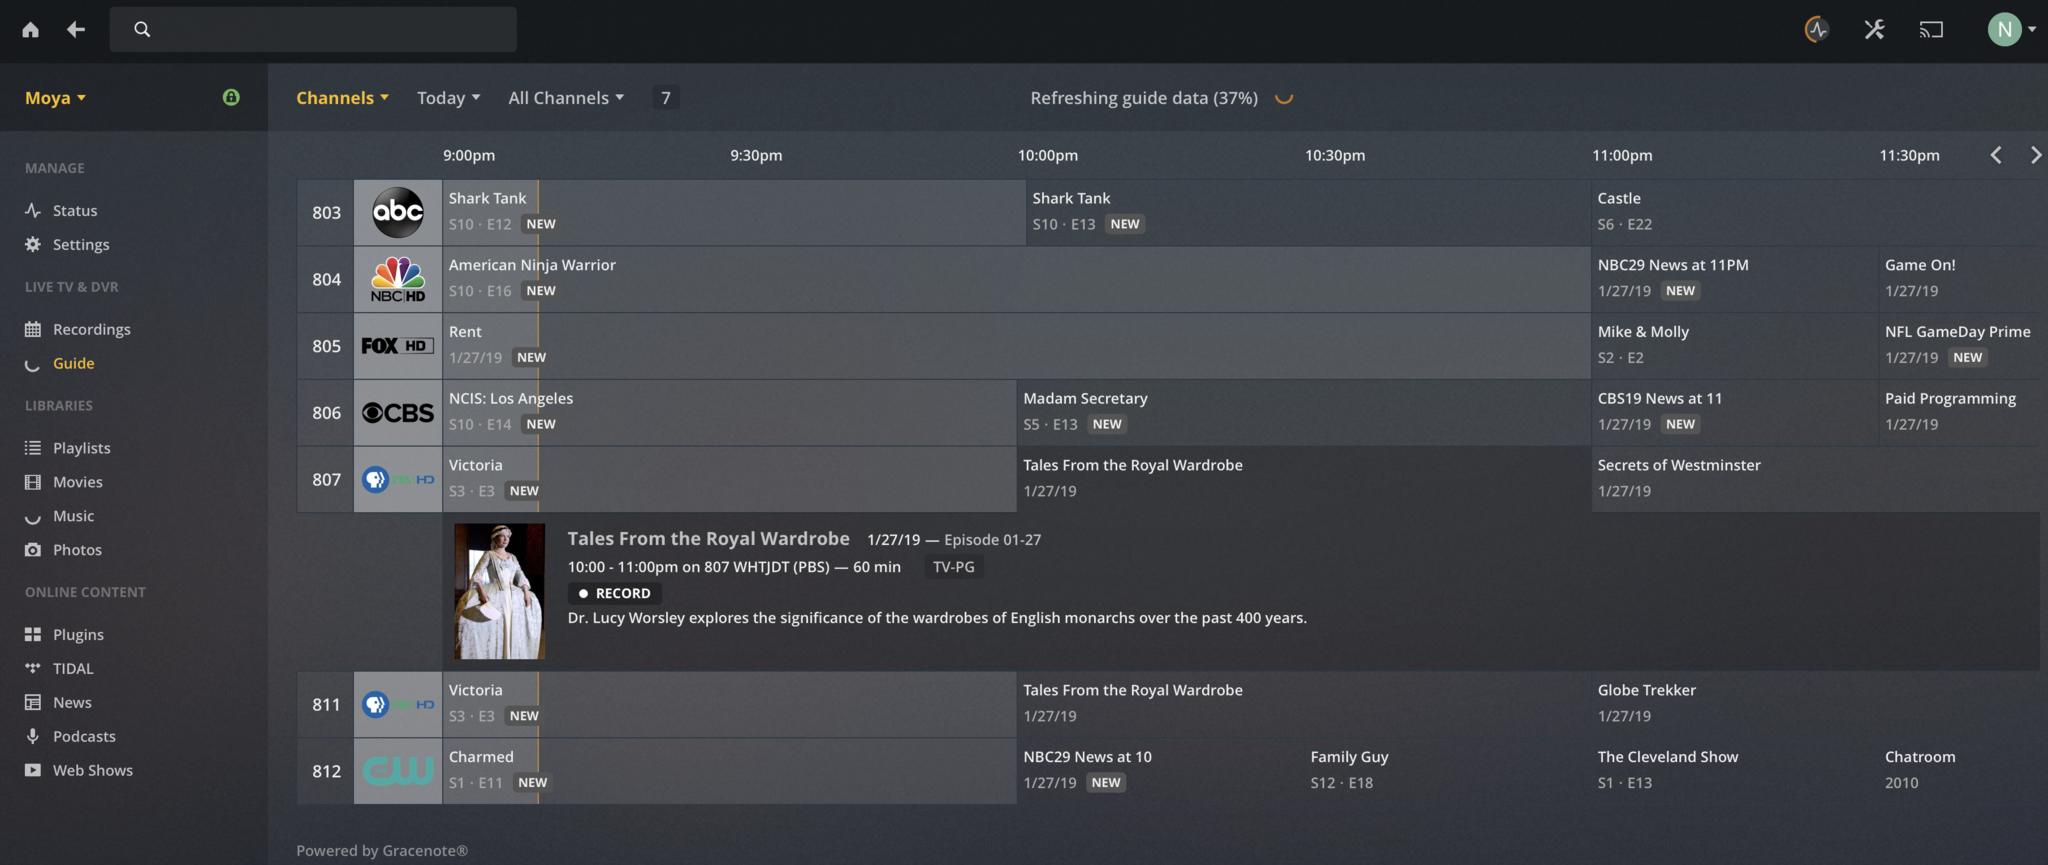
Click a network in the Program Guide to start playing a live feed, or an individual show for more information and the ability to record.
6. Record a show or series
You’ll find record buttons in the Program Guide, or on the listing pages for overall series (to record all episodes) or individual episodes.
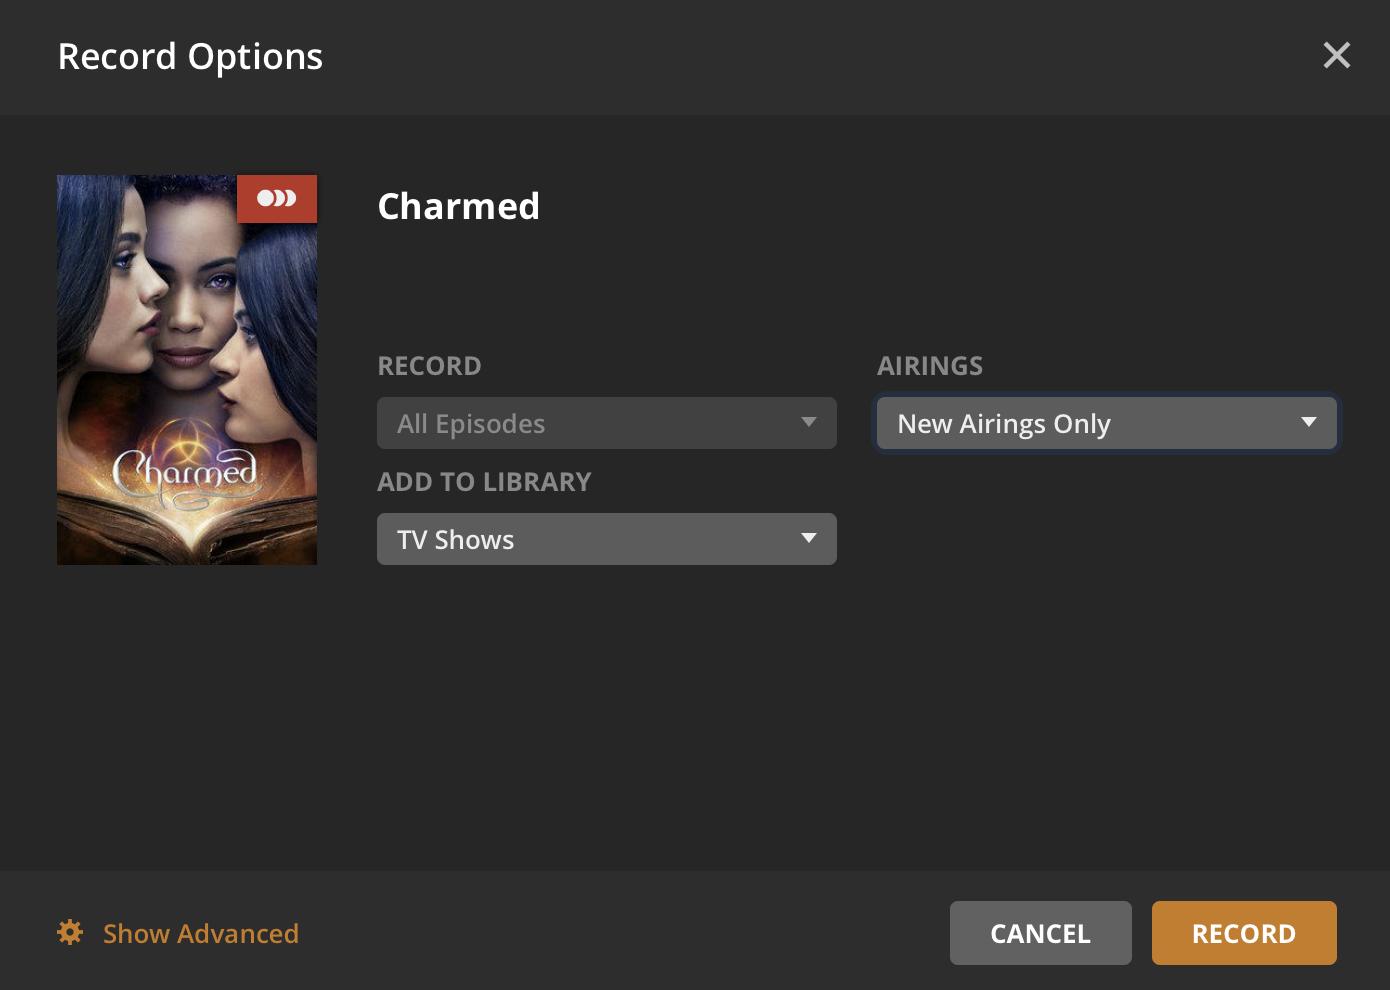
Under "Show Advanced" in the lower left, you can adjust a recording’s start and end times, choose whether to keep lower-resolution or partial recordings, determine if or when you want to delete recorded shows, and turn on Plex’s automatic commercial-skipping feature.
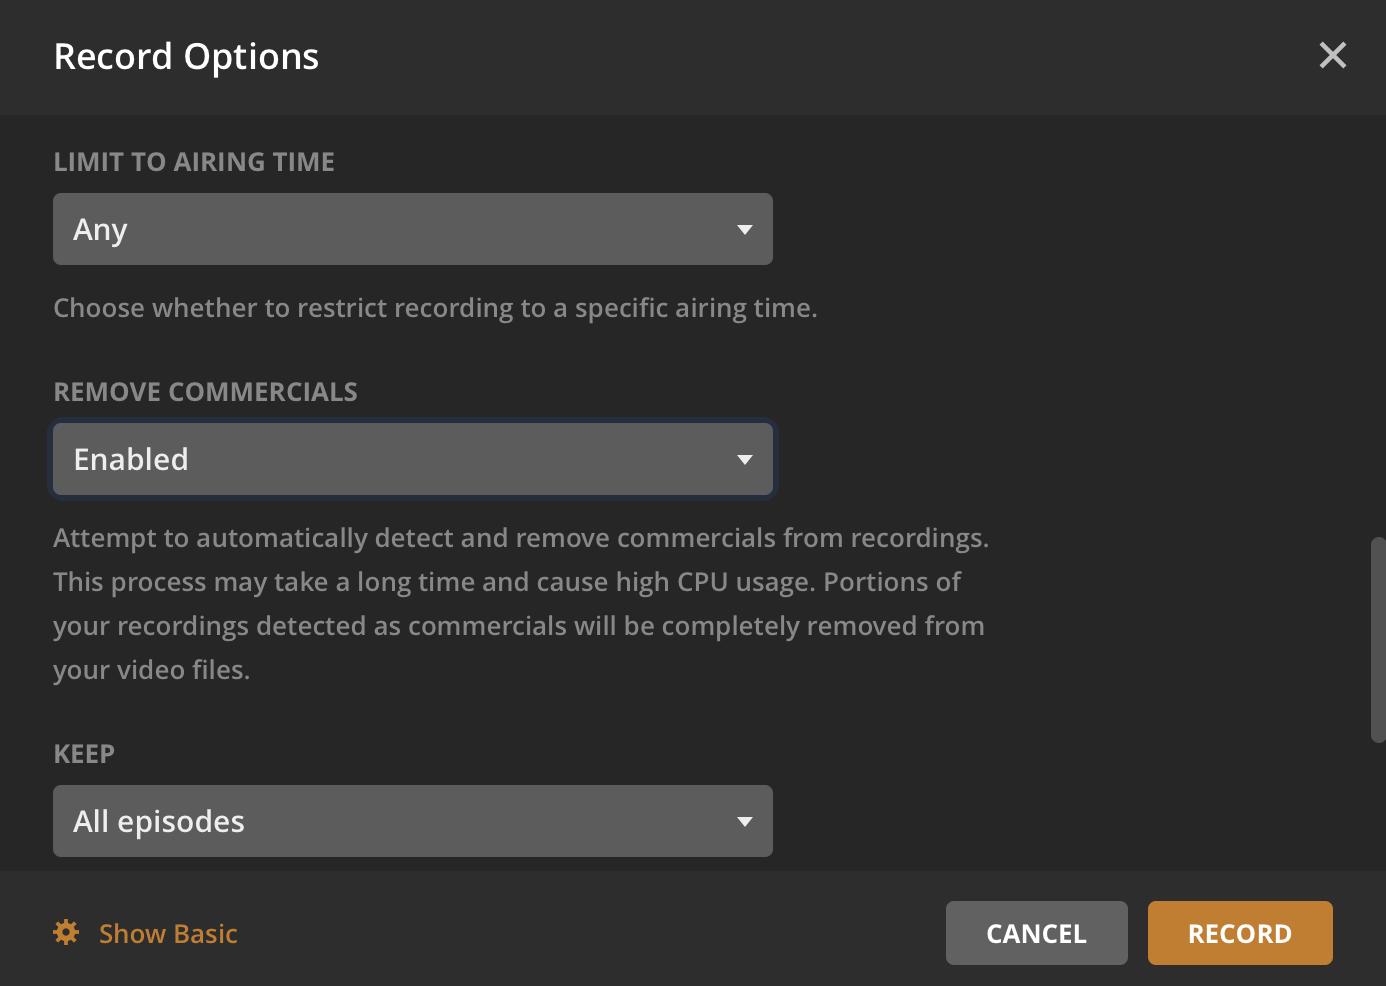
Commercial-skipping works reasonably well, but not perfectly. On my server, trimming out commercials took about one-third the duration of the original recording to process. Sometimes it cut off the last few minutes of an episode, or the first few minutes after the end of a commercial break. Test it first on shows you don’t want to keep, because any commercials – or video it thinks is a commercial break – that it snips out are gone for good.
Most if not all of these record features are also available within the Media Player app for Mac, so you don’t need to log into the Web app to set up or manage recordings.
Helpful tips for Plex on Mac
Now that we’ve covered setup and the basics, we’ll delve into a few of Plex’s cool-but-lesser-known features.
Share or edit your TV recordings
Plex records TV episodes in MPEG Transport Stream (.ts) format. You can play these with VLC or QuickTime, convert them into .mp4 or .mkv format with apps such as Handbrake, share them with family and friends, and even cut out commercials manually with a few minutes’ time and some free software.
Stream friends’ Plex libraries
Under Settings > Family & Friends > Sharing, you can invite friends to share your Plex. Once they accept, they can return the favor and make their libraries available to you.
From the main screen, look for your server’s friendly name at top left, just below the Home and Back buttons. Click it to see other servers connected to yours, and switch to them to browse through their contents. This also works directly from the main Movies, TV Shows, and Music pages. (Just remember to be kind to your friends’ bandwidth!)
Become all-powerful and all-seeing
Okay, not really. But Plex Pass users can use the Dashboard under the status menu to see bandwidth graphs, chart the most popular items on their servers, and more fun statistics.
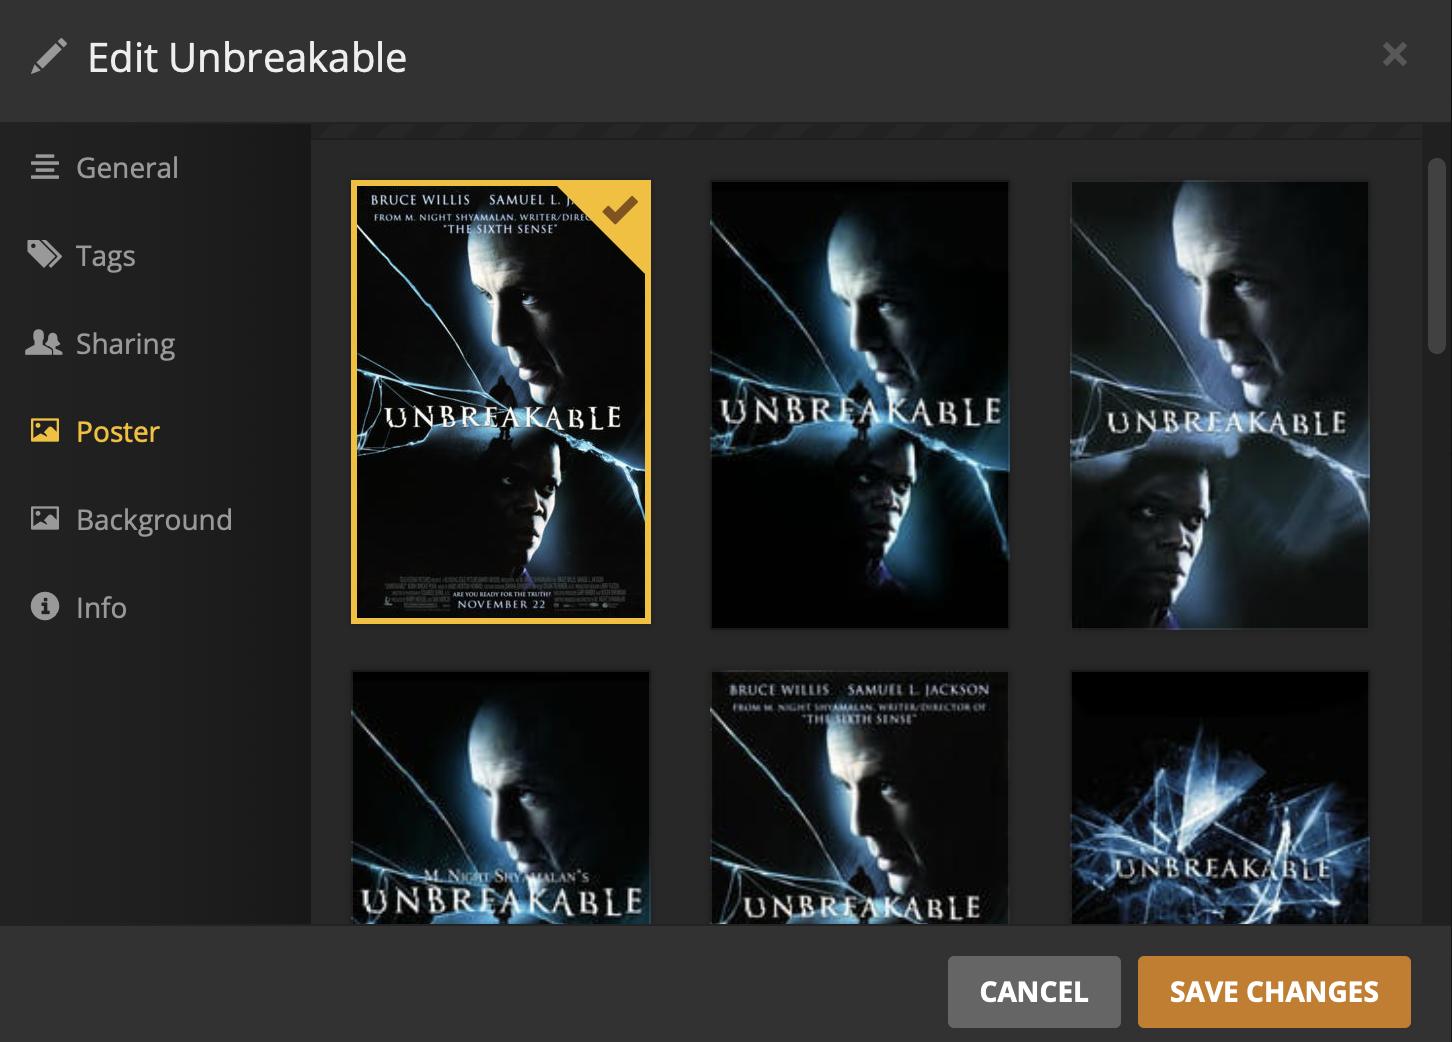
Change poster art and other data for movies and TV shows
On the main page for a TV series or movie, look for the pencil app in the upper right. There, you can edit a show’s metadata and change its poster art. Plex pulls in a wide selection for you to choose from, and you’ll probably find something you like if the default just doesn’t look right.
Follow your favorite teams
When you record a basketball, baseball, football, hockey, or soccer game, check the recording options. Instead of recording just This event, you can tell Plex to record all sporting events from that league, or from either of the teams playing.
Add subtitles to movies automatically
Do you habitually forget to include subtitles when you rip your Blu-rays or DVDs? Don’t go searching for a file you’ll have to download and import – Plex has you covered.
From a movie’s main page, select the subtitles option — by default, it’ll be set to "none" — and then choose More... from the pop-up list. Plex will search its databases and pull in a list of available subtitles online in the language of your choice. Click the arrow at the right of the one you want, then start watching your movie with your newly downloaded subtitle track.
Make Plex play nice with other gadgets
If the Mac on which you’re running Plex isn’t hooked up to your TV, and your TV can’t run apps or isn’t hooked up to an AppleTV or other smart device, you may still be able to enjoy its Plexy goodness on your big screen. Plex can stream media through DLNA (also known as UPnP), a standard found in many Internet-connected entertainment devices. (For instance, I was able to watch the contents of my server on my Sony Blu-ray player, which is hooked into my local network.) Just visit Settings > DLNA to start up the built-in DLNA server.
Roll back to a previous version
Plex’s programmers are only human, and every so often, Something Goes Terribly Wrong in a new update. They’ll fix it sooner or later, but until they do, it helps to go back to the last version of the server that worked as desired. Check out this post in the Plex forums for more information about how to turn back the clock.
Where can I learn more about Plex?
Plex boasts an outstanding support section on its site, with clearly written, searchable help pages and active community forums.
Got any favorite Plex features we didn’t cover here? Stream them to us in the comments below.


Recent Comments