Use this free tool to fit video into smaller file sizes while preserving its picture quality.
In this age of HD and 4K, videos seem to keep getting bigger, but our hard drives and Internet bandwidth don’t always follow suit. Whether you’re ripping your Blu-ray collection to an external hard drive, or just trying to e-mail Grandma a high-quality video of your vacation, sooner or later you’ll wish you could fit all those pixels into a smaller file. Happily, you can, with a little help from Handbrake – a free app that helps you compress video without sacrificing (much of) its quality.
Before we get into how you can use Handbrake, we’ll quickly review how it works its magic, and which options might best help you shrink down your videos to your satisfaction.
How does video compression work?
Videos consist of frames, a series of still pictures played in quick succession to create the illusion of motion. Compression uses clever math to compare each frame to the next one, looking for areas of the picture that don’t change. By merely making a note of the pixels that stay the same, and recording only the pixels that change, video compression algorithms help fit the same video into a smaller amount of total data.
But computers, like humans, aren’t perfect. Throttle up your compression settings too high, and the machine gets sloppy, making the picture look blocky or less detailed (known as artifacting) or smushing a wide gradient of colors into an obvious, rainbow-y pixel smear (known as color banding.) The more compression you apply, the smaller your file, but the worse these problems get.
You’ll need to experiment with compression settings and methods to figure out which balance of quality and file size works best for you. Compressed video won’t ever look quite as good or detailed as the uncompressed original. But with the right settings, it’ll look close enough that you’ll be hard pressed to tell the difference.
Let’s discuss a couple of the choices you’ll need to weigh before you start putting your videos through the wringer.
H.264 vs. HEVC: Which compression algorithm is best?
Handbrake offers a choice of four compression algorithms: MPEG-2 (oldest, relatively lousy), MPEG-4 (still old, not great), H.264 (old, faster, pretty good), and HEVC/H.265 (new, slower, even better). The first two aren’t worth considering with the latter two available.
Tried-and-true H.264 converts relatively quickly, and it can squeeze a high-def Blu-ray file onto a DVD’s worth of space or less. H.265 or HEVC makes files even smaller — but requires hefty processing power to crunch the necessary numbers.
If you don’t have a Mac made from 2017 onward, stick with H.264. Older Macs can play HEVC files just fine, but only the newest models have chips fast enough to encode HEVC decently.
In my tests, both H.264 and HEVC looked remarkably close to the original, even on a big TV screen. And both held up no matter what I threw at them, from animated movies to black-and-white classics to films with lots of fast action and bright colors.
(Note that on some newer, faster computers, Handbrake will also offer Google’s VP8 and VP9 encoders. They’re generally considered comparable in quality to H.264 and HEVC, respectively. )
Constant quality vs. average bitrate
Once you’ve picked an algorithm, you need to decide how you’re going to apply it to your video. Again, the trade-off here boils down fairly simply: a longer wait for smaller files, or a much shorter wait for somewhat larger ones.
Handbrake 1.2.0 and later enables Apple’s VideoToolbox technology to dramatically speed up H.264 (and, for users of post-2017 Macs, HEVC) encoding … but there’s a slight catch. (Big thanks to transcoding wizard Don Melton for his expertise on this next part.)
To make a very, very long story short, you have two options when compressing a video with H.264 or HEVC. Constant quality asks you how close to the original, uncompressed file you want the compressed version to look. Then it adjusts how much compression it applies scene-by-scene to hit that quality mark. This results in smaller final file sizes – but while it looked pretty good to my untrained eye, the resulting picture quality might not match that of your second option.
Average bitrate keeps the amount of compression within a much smaller range, hovering around a target you set. Basically, the higher the bitrate, the better your video looks, and the bigger the resulting file is.
At the same bitrate and file size, HEVC looks better than H.264. At the same general quality, HEVC produces smaller files than H.264.
Handbrake can only do constant-quality encoding in software. If you want the smallest possible file size with HEVC, you’ll have to wait a looooong time, unless you’re rocking one of Apple’s tricked-out, professional-grade, cost-of-a-small-car high-end Macs.
VideoToolbox’s hardware-accelerated compression is a whole lot faster, ranging from "impressively" for HEVC to "insanely" for H.264, but it can only use average bitrate. (As I write this, it’s not clear whether that limitation comes from the chips themselves, or the software talking to them.)
Here’s a quick comparison of approximate file sizes using different compression methods, plus encode times relative to the actual length of the original clip. Remember, those speeds will vary based on your own hardware – I used a 2017 5K iMac – but the numbers below can give you a rough idea of what to expect:
- Original: 1.25GB
- H.264, software encoding: 1x real time, 239.5MB
- HEVC, software encoding: 1.6x real time, 50.3MB (… no, that’s not a typo. But on average, my tests found that constant-quality HEVC ran about 35% smaller than equivalent H.264.)
- H.264, VideoToolbox, 6000kbps: 0.2x real time, 286.8 MB
- HEVC, VideoToolbox, 4000kbps: 0.4x real time, 205.6 MB
Good news for folks with older hardware: You can still use VideoToolbox for H.264. On an aging 2012 Mac mini, I still got compression speeds between 0.25x and 0.33x real time. Even if HEVC’s not an option, you’ll still get great-looking results, and much smaller files, with H.264 compression.
How to get started with Handbrake
1. Install the app
Visit Handbrake’s site to download a copy. But before you open the downloaded file, make sure you validate its checksum. Handbrake’s creators added this security measure after hackers broke into their servers in 2017, briefly replacing the real app with a bogus version that installed malware on unfortunate users’ computers. Take this quick, easy step for added peace of mind.
2. Open the video you want to compress
When you first open Handbrake, it’ll prompt you to browse for the jumbo-sized video you want to diminish. You can also do this via the "Open Source" button in the app’s upper left corner, or by simply dragging a video file onto the app.
3. Find a format for your compressed video
Handbrake can open just about any video format you’ve got, but it will only save compressed files in two formats: MP4 or MKV.
MP4 files play nicely with iTunes and QuickTime, so anyone with a Mac can view them without any additional software. But if your video involves subtitles, you’ll have to actually burn them into the image.
The open-source Matroska format can store lots of different video, audio, and subtitle tracks within a single MKV file, making it ideal for movies converted from DVD or Blu-ray. But iTunes and QuickTime won’t play MKVs, though media servers like Plex and free players like VLC will.
4. Pick your preset
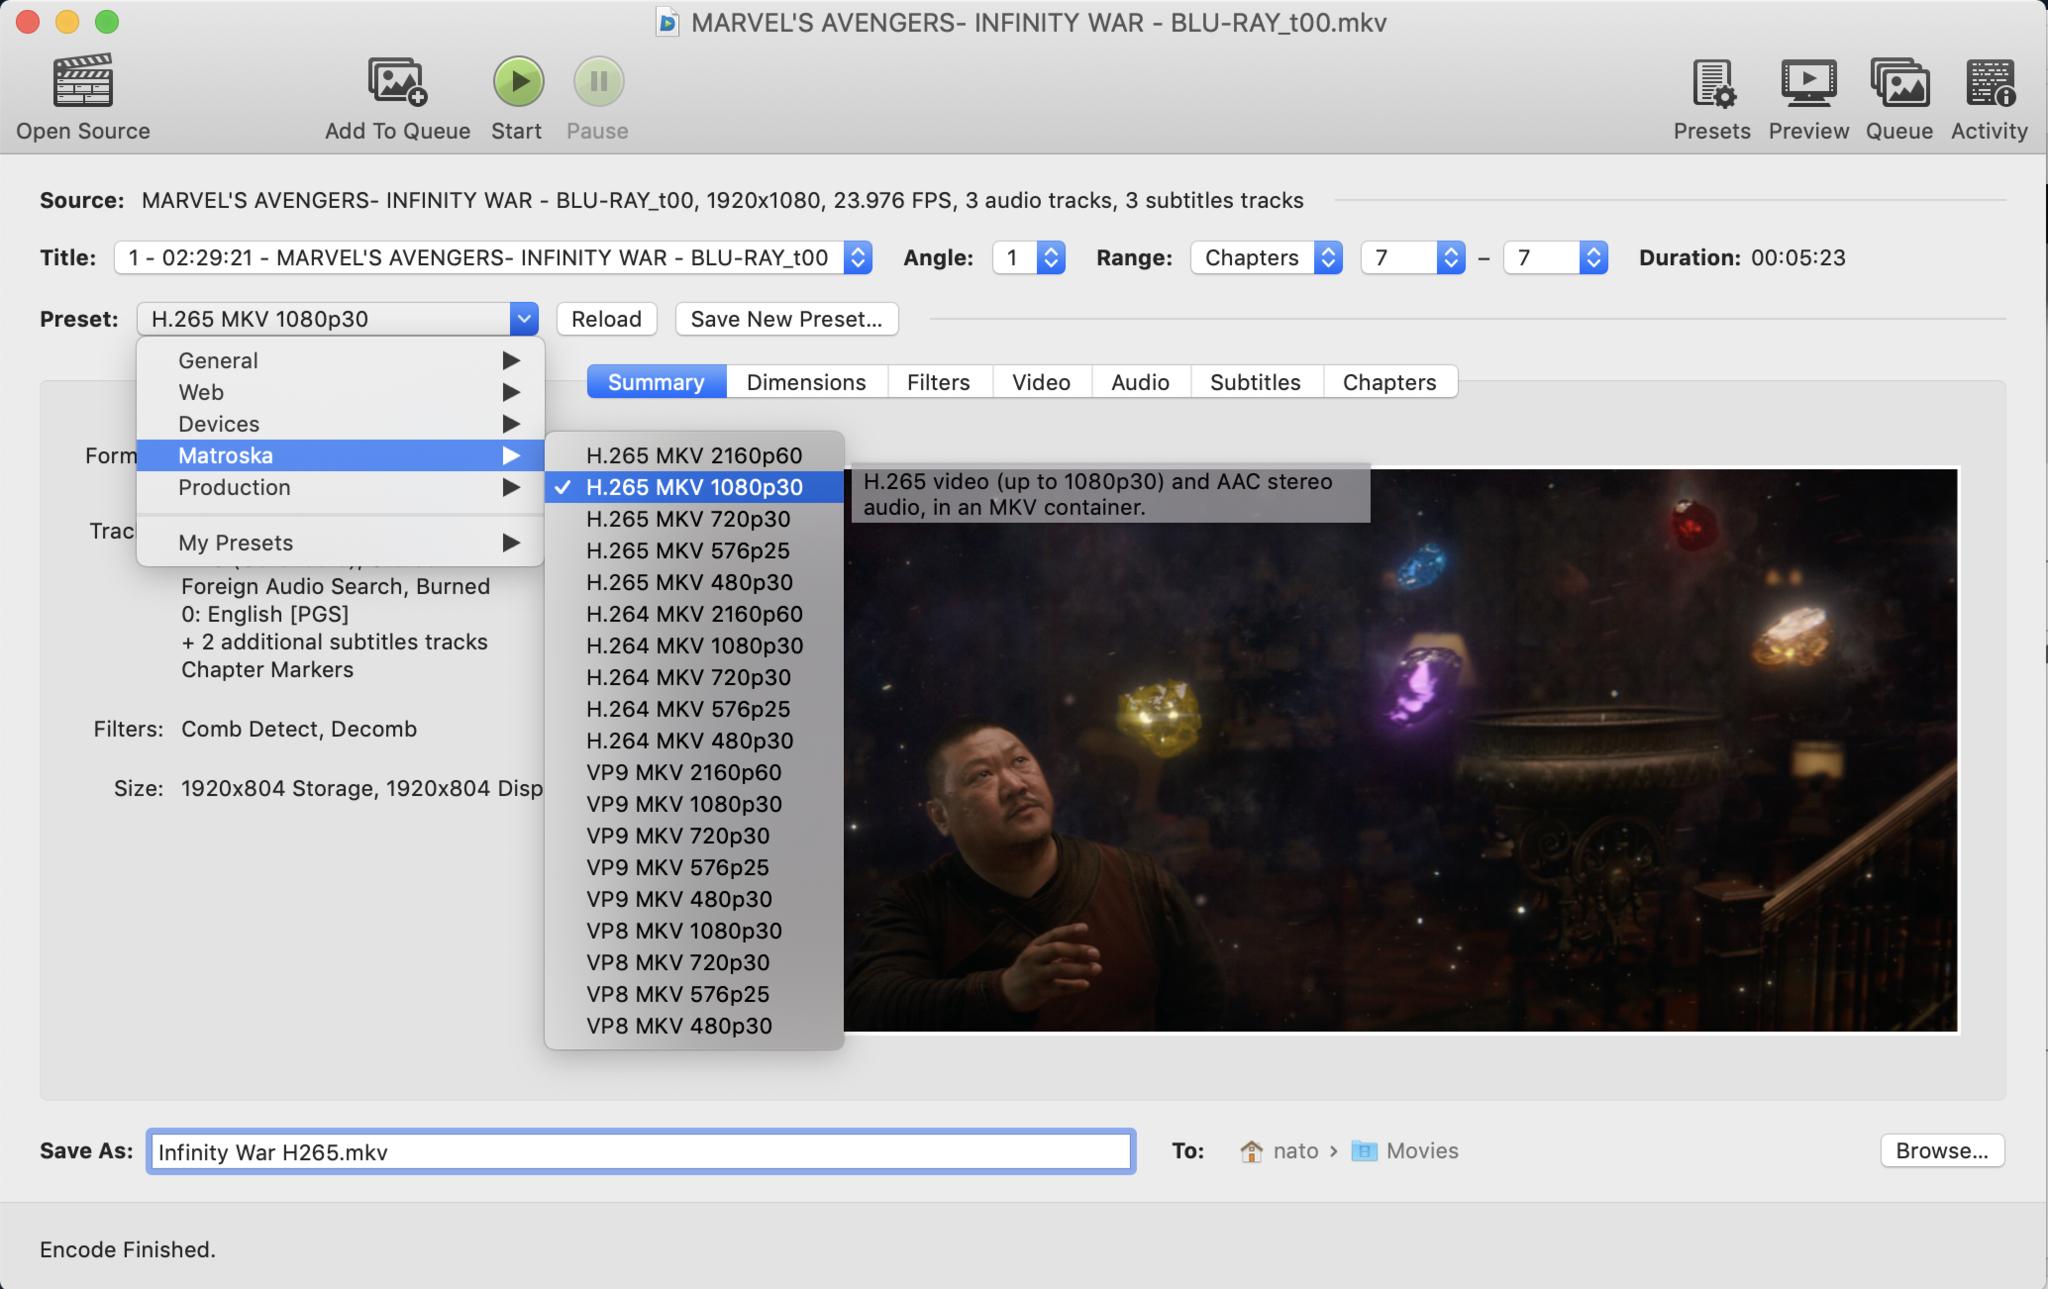
You can choose between MP4 and MKV on Handbrake’s Summary screen, the first one you’ll see after you choose a video to compress. Handbrake offers unusually helpful tooltips when you roll over each item in its interface, so I’ll encourage you to explore on your own, and just cover the basics here.
You’ll probably first notice the preview window in the lower right, which plucks frames out of the source video to give you a rough idea of how the finished product will look.
You can select MP4 or MKV from the Format pulldown menu, but especially if you’re new to Handbrake, you might want to consult the Preset menu just above it. You’ll probably use its General (to create MP4 videos) and Matroska (to create MKVs) settings most often. But look through its Web and Devices settings, too. If you know what you want to do with the final video – say, send it to someone over Gmail or upload it to YouTube – or what specific kind of device you’d like it to play on, these videos can make configuring Handbrake a lot easier for you.
Otherwise, look through the General or Matroska sections, and find a setting that matches the resolution (most likely 480p, 720p, or 1080p) of your source video, and your desired quality. (Very Fast probably won’t yield good results, Fast should be, eh, decent, and HQ and Super HQ offer the best quality, and probably the largest file sizes.
Presets load a bunch of settings that will likely approximate what you want. You can, and should, tinker with them further to your own satisfaction.
5. Choose your compression
You can skip the Dimensions tab — Handbrake’s good at figuring out the resolution of your original image, and you probably don’t want to mess with that. And you can leave the stuff in Filters on autopilot, unless you really want to invert or rotate your video, or turn a color video into black & white. (Finally, the moody, noir version of Sesame Street the world has waited for…)
Instead, head straight to the Video tab. Look for the Video Encoders pulldown menu. It’ll offer you the different compression algorithms we discussed above, including H.264 and H.265 (aka HEVC). Remember, even if you have the option, you won’t want to use the latter on pre-2017 Macs, because H.265 will run sloooooooooooooowly.
Note that H.264 and H.265 come in different flavors — regular and 10-bit for H.264, and regular, 10-bit, and 12-bit for H.265. The higher that bit number, the slower the compression process — but the less likely you are to get color banding in the final product. Those additional bits mean the algorithm can detect and work with more subtle color gradations. If you’re noticing egregious amounts of banding however you adjust the other settings, try one of these – but in most cases, you likely won’t need them.
H.264 and – if your computer’s new and fast enough to work with it – H.265 will also offer VideoToolbox versions, letting you capitalize on that turbo-boosted hardware acceleration I mentioned earlier.
If you choose VideoToolbox, make sure to set your desired bitrate in the Average Bitrate box. 6000kbps gets solid results for H.264. For HEVC, 4000kbps gets perfectly good results at a smaller file size. And 6000kbps will get you a picture closer to that of the original (with a file size roughly one-third larger than 4000kbps, proportionally matching the difference in bitrates). Remember that at the same bitrate, H.264 and H.265 will produce videos with nearly the exact same file size – but H.265 will look better.
If you’re not using VideoToolbox, you’ll be employing software encoding. Make sure Quality is selected, and move the RF slider to set the constant quality you want for your video. RF stands for "Rate Factor," and bigger RF numbers mean more compression, lower image quality, and smaller final file sizes.
In general, an RF of 18-20 looks good for H.264, and 20-22 holds up well for H.265 – but feel free to adjust that. (That sentence will likely, and justifiably, horrify compression connoisseurs. But those settings are plenty good enough for everyday users, and you can always tinker with others for different results.)
If I’m encoding a movie and want to experiment with different settings, I like to use the Chapters pulldowns near the top of the window to pick a single short chapter from the film for test encodes. That way, I don’t have to wait while Handbrake grinds through the whole file. You can also get a good general idea of how different RFs look under H.264 encoding with Matt Gadient’s comparison images and videos.
6. Adjust audio and subtitles
If you’re just compressing a home video you’ve shot, you probably needn’t bother with the Audio or Subtitles tabs. They mainly come in handy when you’re using Handbrake to convert video that originally came from TV recordings, DVDs, or Blu-rays.
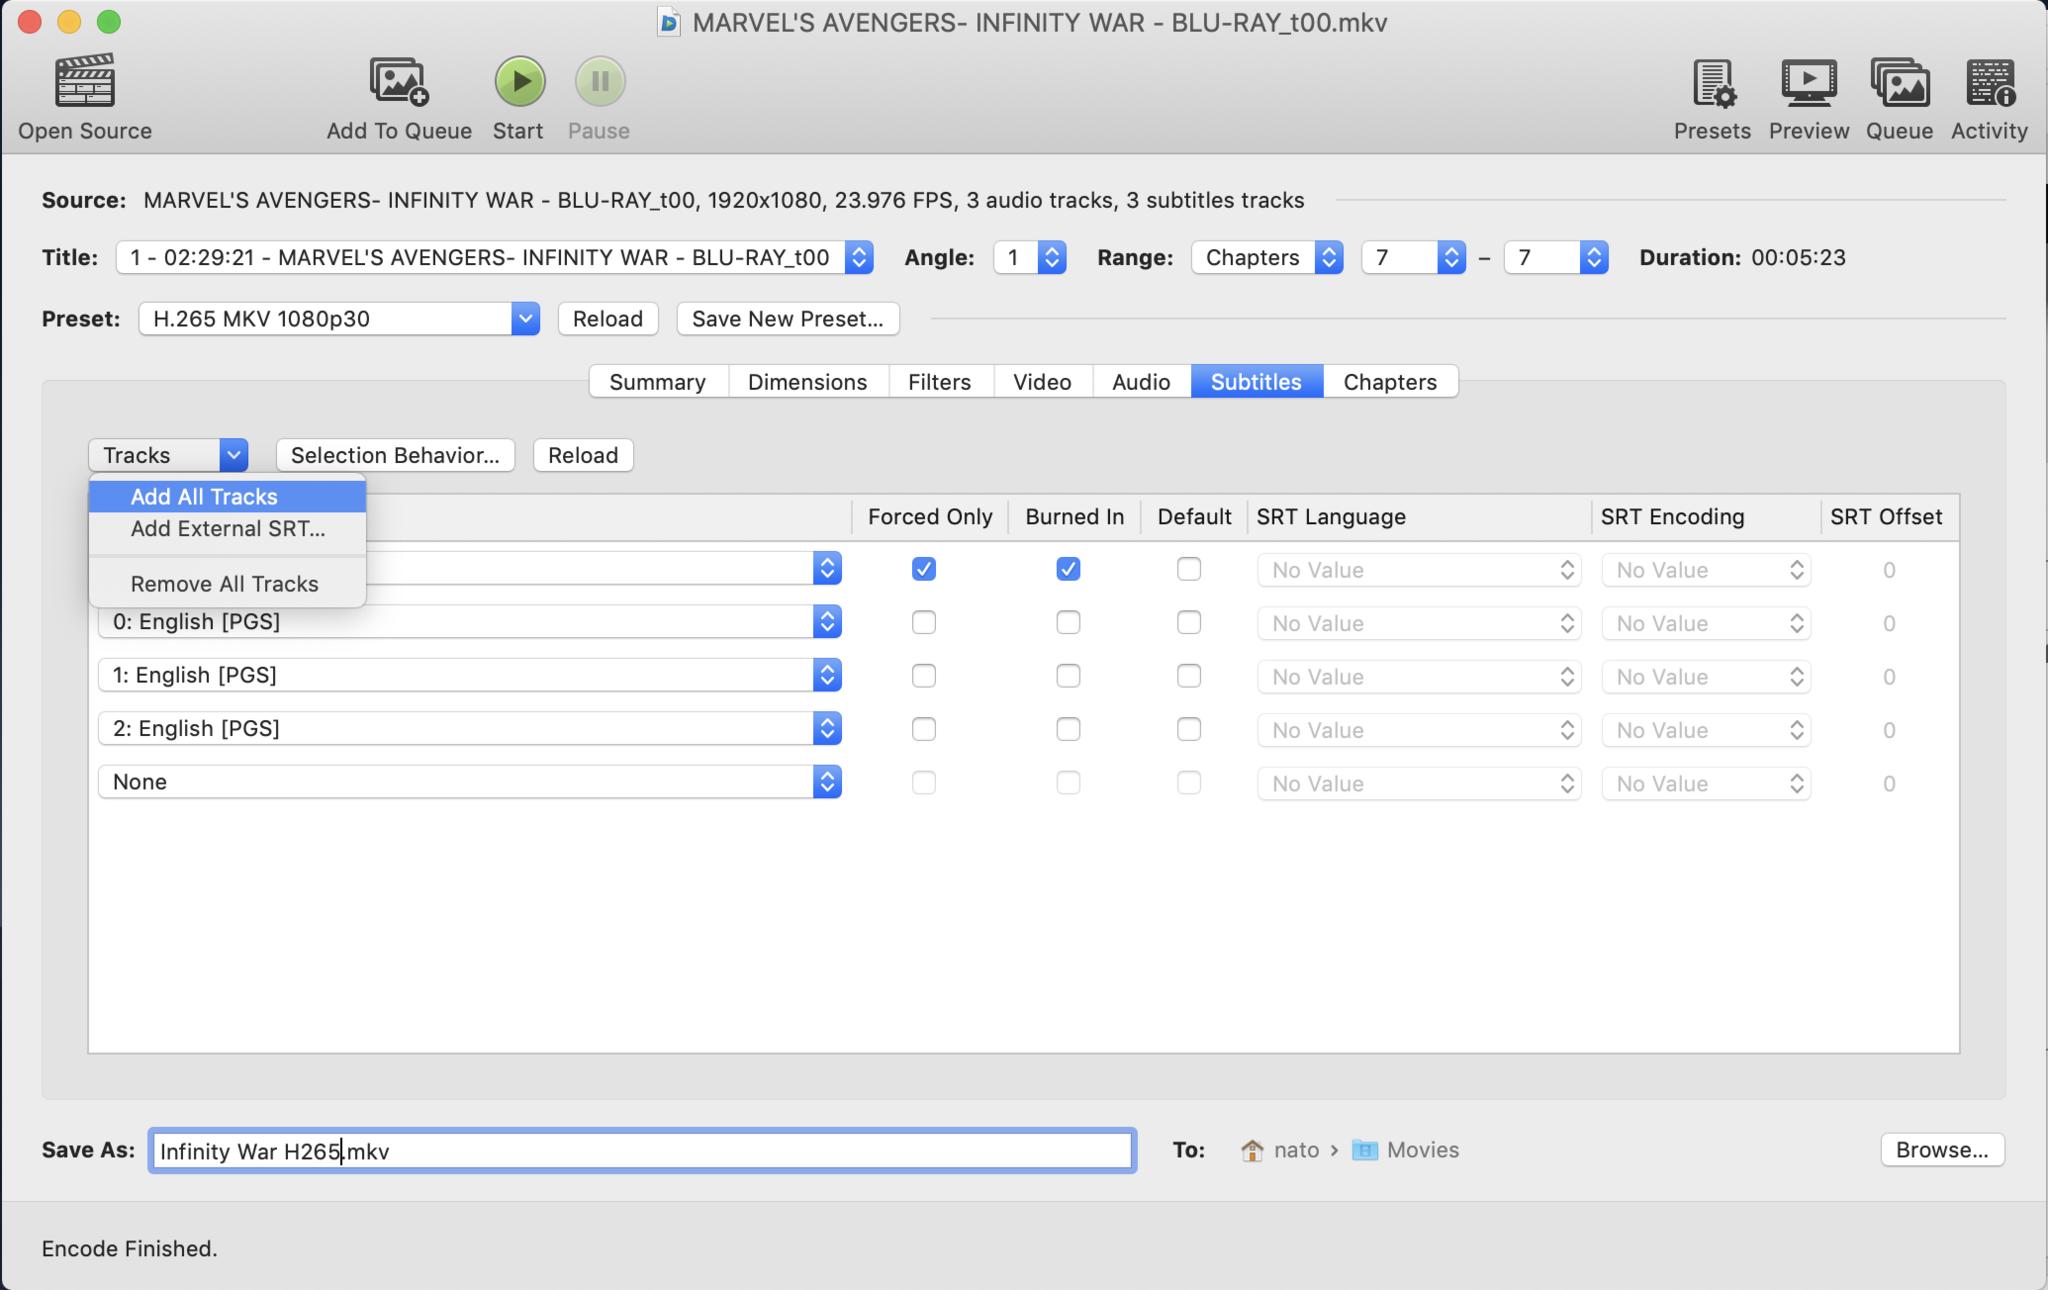
In the Audio tab, you’ll see all the available audio tracks bundled in with your video file. (If you think some are missing, look for the Tracks pulldown menu and select Add All Tracks.) You can use the pulldowns in the track listing to add, reorder, or remove those tracks.
Under Codec, you can either leave the existing setting alone or choose AAC (CoreAudio), which does a good job compressing the audio while preserving its fidelity. And if you know that the source video comes with swanky 5.1 or 7.1 surround sound, use the Dolby Surround or Dolby Pro Logic II options under Mixdown to ensure that your audio sounds great in plain old stereo, but will also remain compatible with multichannel audio systems.
Follow similar steps in the Subtitles tab. If you’re making an MP4, you can only pick one track, and it’ll be burned into the video. For an MKV, set Track 0 to "Foreign Audio Search," and leave "Forced Only" and "Burned In" checked. If your movie has any scenes where non-English dialogue gets subtitled, this should ensure those "forced" subtitles show up – though for whatever reason, Handbrake’s not always great at doing this.
If you always want a subtitle track to automatically appear when you’re watching a film – say, if it’s a foreign-language film – check "Default" next to that track.
7. Save your video
At the bottom of the Handbrake window, you’ll find Save As:. Give the resulting file has the name you want. Even if you’ll be storing your movies on an external hard drive, I recommend creating the compressed files on your local drive. Handbrake will work much faster, even when you factor in the time needed to copy them over later.
When you’re finished, click the big Start button at the top of the window, and watch the progress bar creep along the bottom of the window until your newly compressed file is ready. (This might take a while, depending on whether you choose software or hardware encoding, and how big the original file is. Maybe go get a snack or a sandwich or watch some TV or something.)
If you’ve got lots of different videos to compress, use Handbrake’s Queue feature. Open a source, follow the steps above to set it up how you want, then click the Add to Queue button at the top of the window. Then open another source and do it all over again. When you’re all done, the Start button will begin working through your queue in order, and won’t stop until every video’s finished.
You can review that queue, see your settings for each item in it, and remove queued items before Handbrake gets to them by clicking the Queue button in the upper right of the window.
A quick note about DVDs and Blu-rays
Handbrake will not directly rip and compress video from copy-protected DVDs or Blu-rays. Handbrake used to support direct ripping for DVDs, but it removed that feature a few versions back. I’m not saying you should search online for Handbrake install libdvdcss mac to safely learn more about that whole situation and how one might hypothetically remedy it, but I’m also not saying you shouldn’t. As for Blu-rays, you’ll need to employ other means.
Put the squeeze on your .MOVs
If you want to really dive deep into transcoding, and you don’t fear using the command line in Terminal, I recommend the aforementioned Don Melton’s transcoding scripts on GitHub. But for most users, Handbrake for Mac should easily cover all your video-compressing needs.
Got any handy Handbrake tips we missed? Pack them into the tiniest possible space and post them in the comments below.


Recent Comments