Get to know your Apple Pencil a little better with these great tips and tricks.
Whether you have the original or new second-generation model, there’s more to your Apple Pencil than just writing and drawing. There are things that you can do with the Apple Pencil that might not be common knowledge. For instance, did you know that you could replace the tip of your Apple Pencil? What about using the Apple Pencil with a piece of paper covering your iPad’s screen, allowing you to trace something from paper onto your iPad?
Here are some tips and tricks that you can use with your Apple Pencil. Most of them will work for both the first-generation and second-generation Apple Pencil.
- Replace the tip of your Apple Pencil
- Tilt to shade, press for pressure
- Palm rejection
- Check your Apple Pencil’s battery
- Double-tap to switch modes on the second-generation Apple Pencil
- How to change the double-tap function for the second-generation Apple Pencil
- Trace through paper
Replace the tip of your Apple Pencil
Using the Apple Pencil continually will undoubtedly cause its tip to become worn down over time. You can replace it easily by unscrewing the tip from the Apple Pencil and replacing it with a new tip. The first-generation Apple Pencil comes with one replacement, but if you’ve used that, or you have a second-generation Apple Pencil, you’ll need to buy Apple’s Pencil Tip 4 Pack, available for $19.
Tilt to shade, press for pressure
When drawing using the Apple Pencil, you can easily shade in an area of your work by tilting the Apple Pencil towards one side and moving the flat side of the Pencil tip to shade it in, just as you could with an analog pencil on paper.
The Apple Pencil is also pressure sensitive, with most drawing and writing apps that support Apple Pencil allowing you to create thicker or thinner lines and shapes depending on how much pressure you put on the Pencil tip.
Palm rejection
One of the annoyances of using previous iPad styli was that you had to hold your hand in such a way as to not rest your palm on your iPad. I don’t know how you hand-write or draw things, but for me, that was the worst thing about using this sort of tool on the iPad. Stylus and app developers both created their own palm-rejection features, but they were imperfect fixes, often requiring you to disable other features, or required you to manually turn palm rejection on.
When using the Apple Pencil, the iPad Pro has near-perfect palm rejection. Sure, I’ll still have the odd palm touch register, but for the most part, it’s smooth sailing. Just start using the Apple Pencil on your iPad Pro, and palm rejection activates without another word.
Check your Apple Pencil’s battery
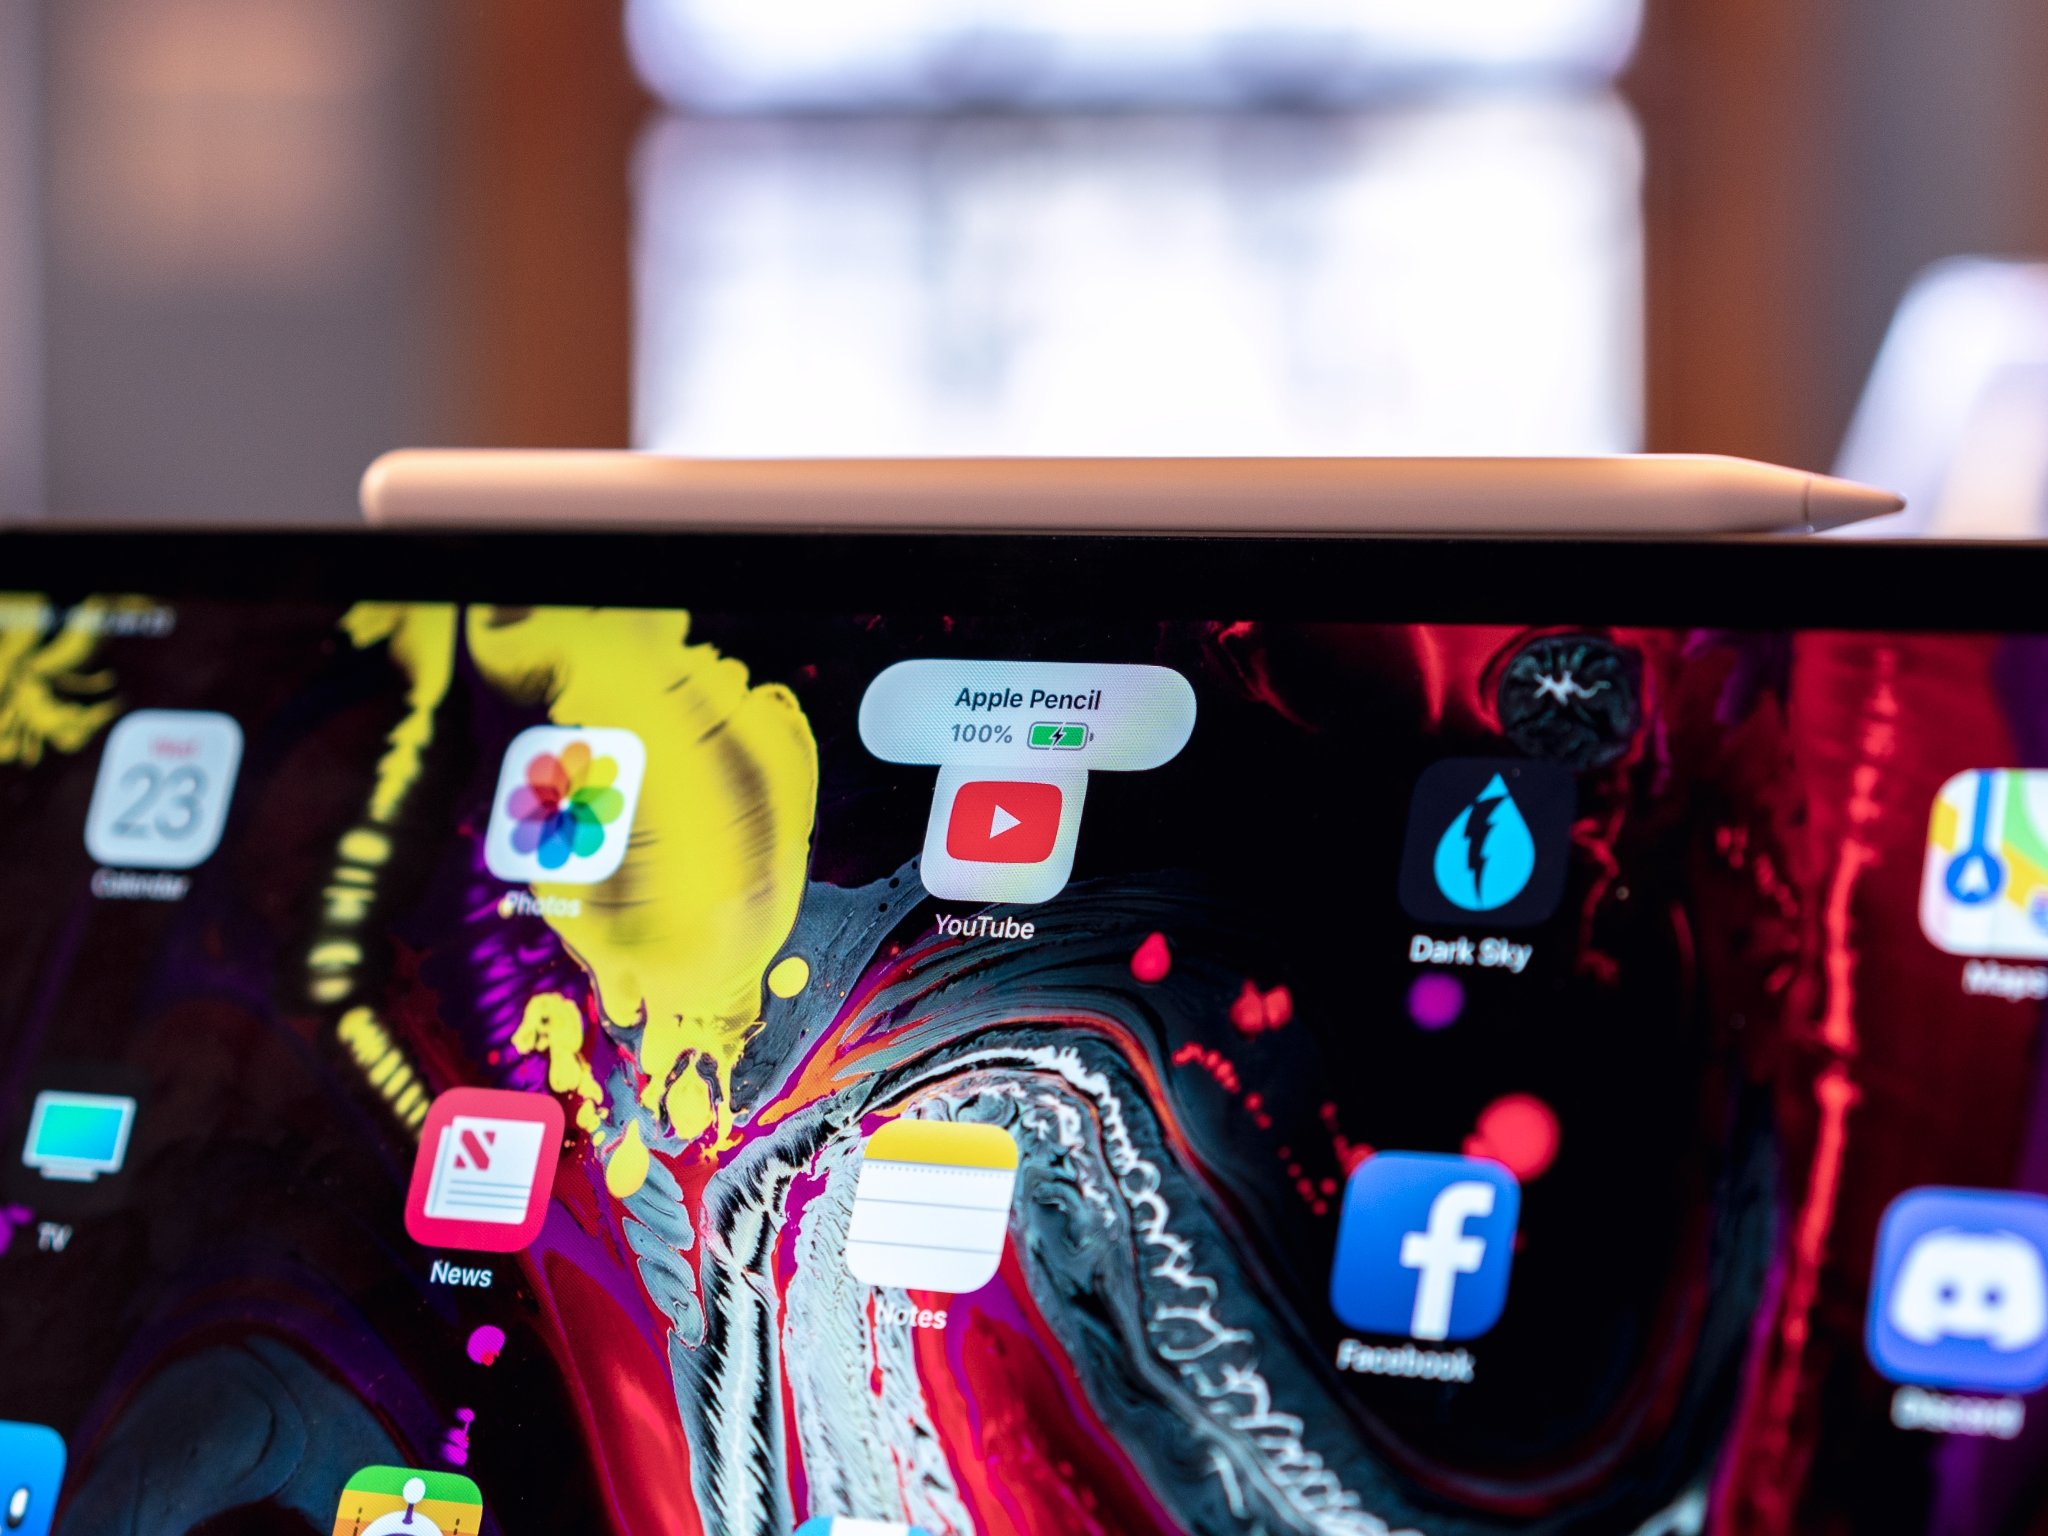
If you want to check your Apple Pencil’s battery, you can do so using the Notification Center widget view and the iOS battery widget. The widget shows the battery level of your current device, as well as all of the accessories connected to it, including Bluetooth headphones and yes, the Apple Pencil.
How to check the battery level on Apple Pencil
Of course, it’s even easier to do with the second-generation Apple Pencil and 2018 iPad Pro. Simply magnetically attach the Pencil to the charging surface on the iPad Pro, then observe the battery readout that appears at the top of the screen.
Double-tap to switch modes on the second-generation Apple Pencil
The latest generation of the Apple Pencil comes with a flat surface that you can double-tap in order to switch between tools. For instance, if you’re writing or drawing with the Apple Pencil and make a mistake, double-tap the surface to switch to the eraser tool in your present app and erase the error. Or use the double-tap to switch between your current and previous tools.
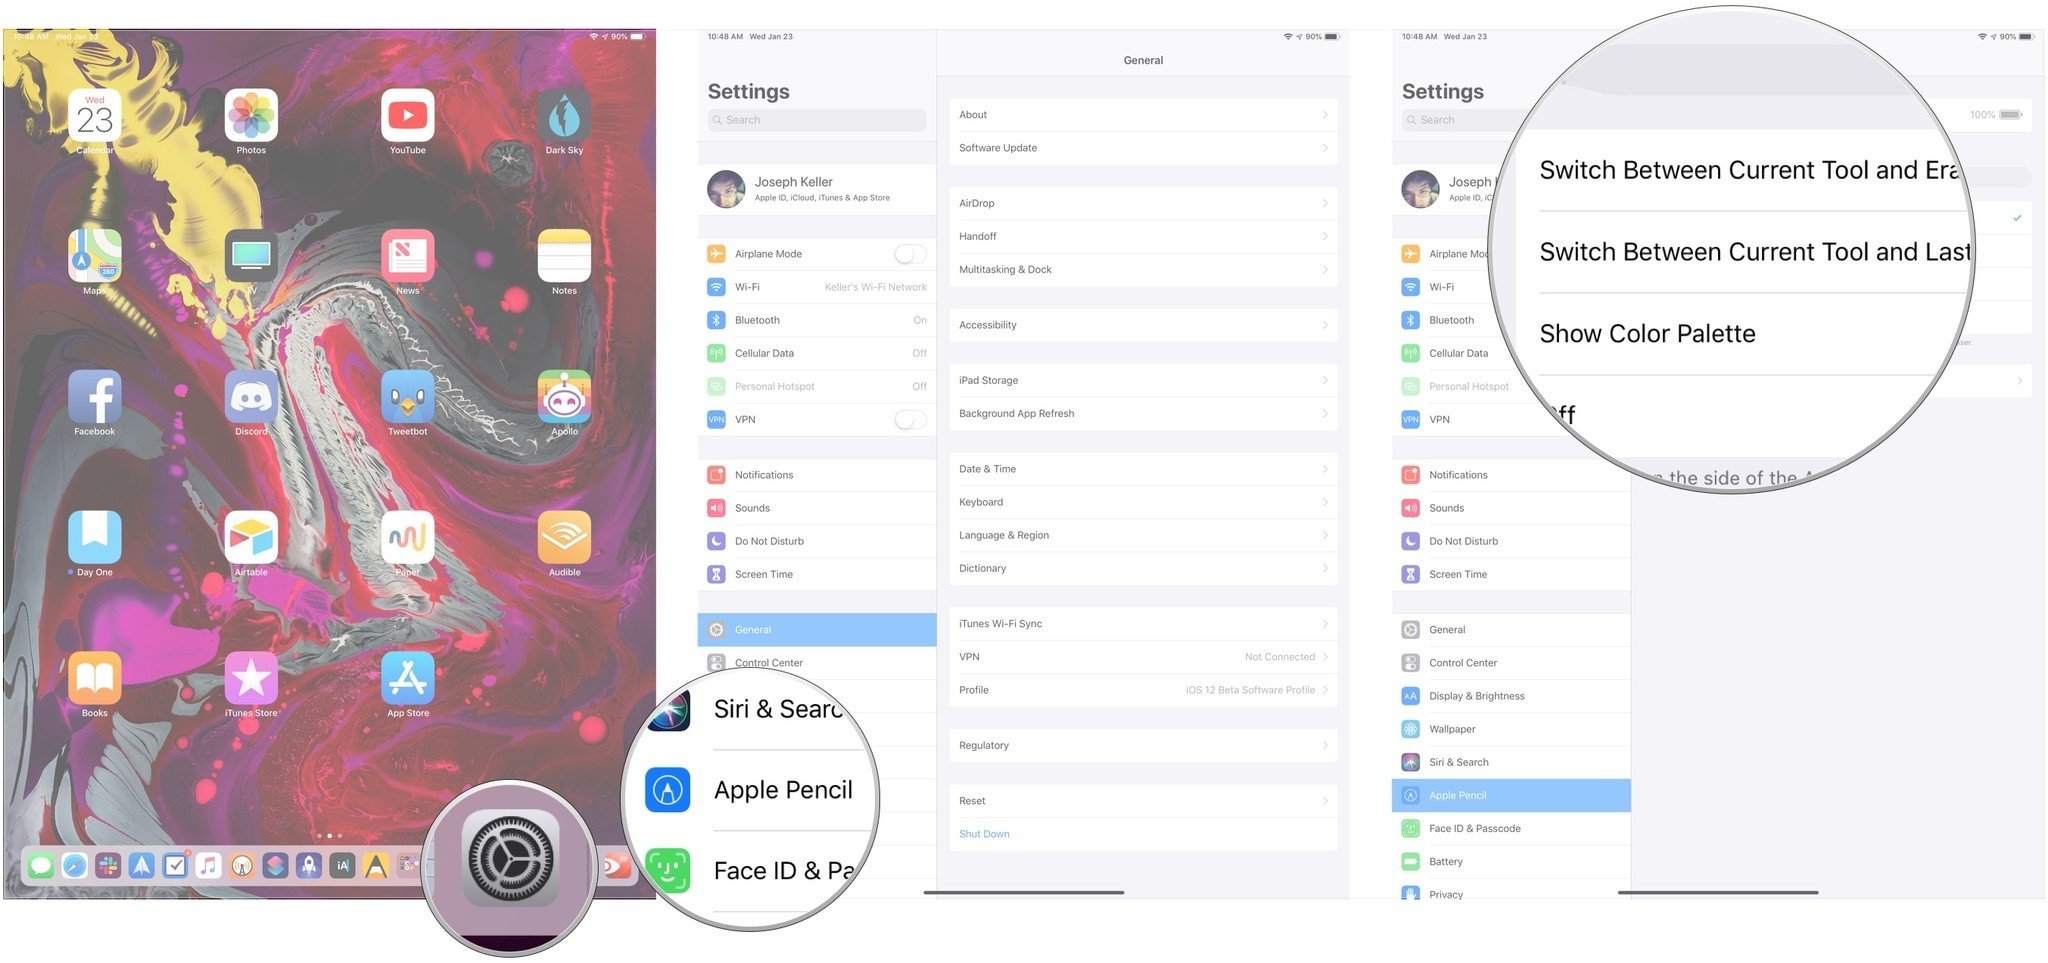
You can change how the Apple Pencil’s double-tap gesture works in Settings on your 2018 iPad Pro.
How to change the double-tap function for the second-generation Apple Pencil
- Open Settings on your iPad Pro.
- Tap Apple Pencil.
-
Tap Switch Between Current Tool and Eraser, Switch Between Current Tool and Last Used, Show Color Palette, or Off.
Trace through paper
This is pretty cool. You can actually write on your iPad through paper using your Apple Pencil. Of course, you don’t want to try and use especially thick paper, but standard printer paper should work just fine. This is particularly useful if you want to trace something into a drawing app.
Get an Apple Pencil
If you don’t already have an Apple Pencil, you can get one now from Apple. If you have a 2015, 2016, or 2017 iPad Pro, or a 2018 9.7-inch iPad, you’ll need the first-generation Pencil. If you have a 2018 iPad Pro, you’ll need the second-generation Pencil.
- Apple Pencil (1st Generation) ($99) – See at Apple
- Apple Pencil (2nd Generation) ($129) – See at Apple
iMore – The #1 iPhone, iPad, and iPod touch blog

Recent Comments